Haier EB-3190EC User Manual - Page 7
Auto reheat, Turntable on/off, Child lock
 |
View all Haier EB-3190EC manuals
Add to My Manuals
Save this manual to your list of manuals |
Page 7 highlights
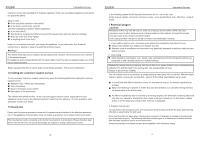
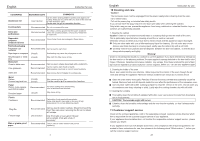
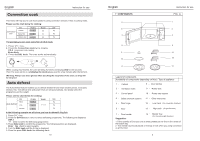
English Instruction for use Auto reheat The auto Reheat feature have pre-programmed cooking time. You do not need to set either the cooking times or the power level. You can adjust the size of the serving by turning the dial knob. Put on a ceramic plate and cover with microwave cling film. This programme is suitable for meals consisting of 3 components (e.g. meat with sauce, vegetables and a side dish like potatoes, rice or pasta). For example 1. Press / key. 2. Press the Reheat button, display: HE (Reheat mode) Enter Auto Kg (flash to select the weight) 3. Press the DIAL knob, display:0.2 4. Press the DIAL knob to start. or turn the DIAL knob to select weight, Press the DIAL knob, The oven works automatically. / REHEAT C _ + +30s _ +30s [ C + C _ + +30s _ +30s ]C + When cooking has finished, the oven will beep five times and display End for ten seconds. Then The oven will be on call(display the clock),please wait for a few minutes after the ferment. Turntable on/off The Turntable on/off button enables you to stop the the turntable manually, then you can take the food or recipients out easily. Do not press the Turntable on/off button during the cooking process. Cancel the cooking phase, before pressing the turntable On/Off button. 1. Press the Turntable on/off( )button. The turntable will not rotate. 2. To switch the turntable rotating back on, press the Turntable on/off ( The turntable will rotate. ) button again. Child lock Your oven has a safety feature that prevents accidental running of the oven. Once the child lock is set, you will be unable to use any functions and no cooking can take place. However your child can still open the oven door. 1.Press / key. 2.Press and hold / key until --- --- appears on the display and beep sounds. The Child lock is now set. 3.To cancel Child lock ,press and hold / key until --- --- disappears. You will hear beep when it's released. 23 English Instruction for use Caution ! 1. Some items with high lead or iron content are not suitable for cooking utensils. 2. Utensils should be checked to ensure that they are suitable for use in microwave ovens. The following items are under no circumstances suitable for microwave cooking: Metal containers, cutlery or skewers Containers with metal trimming (e.g. gold rim ) Bags sealed with metal parts (clips) Cartons coated with plastic film or foil Coloured or recycled paper Metal objects may trigger off unwanted sparking and potentially damage the appliance. Coated cartons, colored or recycled paper may contain substances that may lead to overheating and fire. If your appliance is also equipped with a fan or a grill function, make sure the dishes you use have a high heat resistance. 2 Where to install the oven 1. Before installing your new appliance, you need to check as for visible external damage. Under no circumstances should the appliance be started, if it is damaged. Therefore, thoroughly check the appliance as for: Damaged packaging, indicating that the appliance may have been damaged during shipment Damaged cabinet Damaged door glass panel Visible damage to the cable / plug If you suspect any damage, please have the appliance tested by the customer support service. At all costs prevent the emission of any hazardous microwave radiation by not starting up a damaged oven. 3 Installing the oven (FIG. A) a) Unpack the appliance b) Remove all objects from the inside of the oven. c) Carefully remove all plastic films and stickers from: - the cabinet - the door - the Turntable axle - drive shaft Failure to carefully remove plastic films and stickers may lead to a fire hazard. d) Clean the oven interior with a damp cloth. Do not use sharp cleansers or scouring agents! e) Unpack the turntable (not all models are equipped with) and its undercarriage f) Place the undercarriage in the circular track on the oven interior floor g) Lay the turntable onto the undercarriage. By gently turning it, the guide fits into the drive shaft. 4
-
 1
1 -
 2
2 -
 3
3 -
 4
4 -
 5
5 -
 6
6 -
 7
7 -
 8
8 -
 9
9 -
 10
10 -
 11
11 -
 12
12 -
13
-
14
-
15
-
16
 |
 |
