Haier HWD1000 Instruction Manual - Page 7
Installation - door
 |
UPC - 688057394381
View all Haier HWD1000 manuals
Add to My Manuals
Save this manual to your list of manuals |
Page 7 highlights
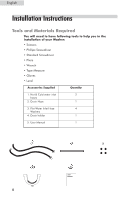
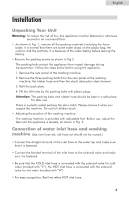
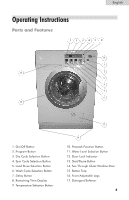
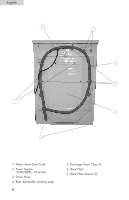
English Installation Unpacking Your Unit Warning: To reduce the risk of fire, this appliance must be fastened or otherwise secured to an uncovered floor. • As shown in Fig. 1, remove all the packing materials (including the foam base). It is normal that there are some water drops on the plastic bag, the cushion and the porthole. It is because of the water testing before leaving the factory. • Remove the packing screws as shown in Fig.2. The packing bolts protect the appliance from impact damage during transportation. Follow the steps below before using the appliance. 1. Remove the rear panel of the washing machine. 2. Remove the three packing bolts from the rear panel of the washing machine, the rubber hose and then the shock absorption steel channel. 3. Refit the back plate. 4. Fill the left holes by the packing bolts with plastic plugs. Attention: The packing bolts and rubber hose should be kept in a safe place for later use. There is a plastic jacket packing the door catch. Please remove it when you unpack the machine. Do not let children touch. • Adjusting the position of the washing machine: The washing machine is provided with adjustable feet. Before use, adjust the feet until the appliance is leveled, as shown in Fig. 3. Connection of water inlet hose and washing machine (Use new hose-set, old hose-set should not be reused.) • Connect the straight terminal of the inlet hose to the water tap and make sure that it is fastened. • Connect the bended terminal of the inlet hose to the solenoid valve and make sure it is fastened. • Be sure that the COLD inlet hose is connected with the solenoid valve for cold water (marked with "C"), the HOT inlet hose is connected with the solenoid valve for hot water (marked with "H"). • For easy recognition, Red line refers HOT inlet hose. 6
-
 1
1 -
 2
2 -
 3
3 -
 4
4 -
 5
5 -
 6
6 -
 7
7 -
 8
8 -
 9
9 -
 10
10 -
 11
11 -
 12
12 -
13
-
14
-
15
-
16
-
17
-
18
-
19
-
20
-
21
-
22
-
23
-
24
-
25
-
26
-
27
-
28
-
29
-
30
-
31
-
32
-
33
-
34
-
35
-
36
-
37
-
38
-
39
-
40
-
41
-
42
-
43
-
44
-
45
-
46
-
47
-
48
-
49
-
50
-
51
-
52
-
53
-
54
-
55
-
56
-
57
-
58
-
59
-
60
-
61
-
62
-
63
-
64
-
65
-
66
-
67
-
68
-
69
-
70
-
71
-
72
-
73
-
74
-
75
-
76
 |
 |