Hamilton Beach 58800 Use and Care Manual - Page 5
cont. - professional blender
 |
View all Hamilton Beach 58800 manuals
Add to My Manuals
Save this manual to your list of manuals |
Page 5 highlights
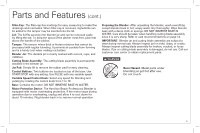
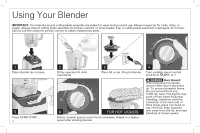
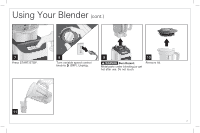
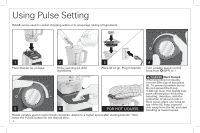
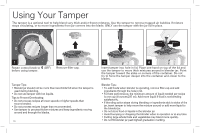
Parts and Features (cont.) Filler-Cap: The filler-cap has markings for easy measuring to make fine dressings and marinades. When filler-cap is removed, ingredients can be added or the tamper may be inserted into the lid. Lid: The lid fits securely into blender jar and can be removed easily by lifting the tab. To keep the spout of the pitcher mess-free, place tab above the handle of the pitcher. Tamper: The tamper mixes thick or frozen mixtures that cannot be processed with regular blending. It prevents air pockets from forming and is a handy tool when making nut butters. Blender Jar: The durable jar is clearly marked with ounces, cups, and milliliters. Cutting Blade Assembly: The cutting blade assembly is permanently installed in the blender jar. Jar Pad: Simply lift to remove the rubber pad for easy cleaning. Control Buttons: Two buttons are located on top of the base. Use START/STOP with any setting. Use PULSE with any variable speed. Variable Speed Control Knob: Select any speed for blending and pulsing by rotating the control knob from 1 to 10. Base: Contains the motor. DO NOT IMMERSE BASE IN WATER. Motor Protection Device: The Hamilton Beach Professional Blender is equipped with motor overheating protection. If the motor stops during operation due to overheating, unplug and allow it to cool down for about 15 minutes. Plug blender back in to resume normal operation. Preparing the Blender: After unpacking the blender, wash everything except blender base in hot, soapy water. Dry thoroughly. Wipe blender base with a damp cloth or sponge. DO NOT IMMERSE BASE IN WATER. Care should be taken when handling cutting blade assembly since it is very sharp. Refer to care recommendations on page 14. IMPORTANT: Blender jar and cutting blade assembly are subject to wear during normal use. Always inspect jar for nicks, chips, or cracks. Always inspect cutting blade assembly for broken, cracked, or loose blades. If jar or cutting blade assembly is damaged, do not use. Call our customer care center to obtain replacement parts. w WARNING Burn Hazard. Metal parts under blending jar get hot after use. Do not touch. PULSE STSATROTP 5
-
 1
1 -
 2
2 -
 3
3 -
 4
4 -
 5
5 -
 6
6 -
 7
7 -
 8
8 -
 9
9 -
 10
10 -
 11
11 -
12
-
13
-
14
-
15
-
16
-
17
-
18
-
19
-
20
-
21
-
22
-
23
-
24
-
25
-
26
-
27
-
28
-
29
-
30
-
31
-
32
-
33
-
34
-
35
-
36
-
37
-
38
-
39
-
40
-
41
-
42
-
43
-
44
-
45
-
46
-
47
-
48
 |
 |
