Harbor Freight Tools 61454 User Manual - Page 17
Troubleshooting cont., PLEASE READ THE FOLLOWING CAREFULLY
 |
View all Harbor Freight Tools 61454 manuals
Add to My Manuals
Save this manual to your list of manuals |
Page 17 highlights
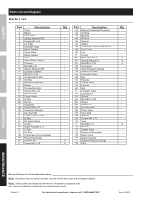
SAFETY SETUP Troubleshooting (cont.) Problem Overheating Compressor starts and stops excessively Excessive noise Moisture in discharge air Oil in discharge air Safety Valve "pops" Air leaks from pump or fittings Air leaks from tank Possible Causes 1. Air filters need cleaning/replacing. 2. Crankcase oil too thin or incorrect type. 3. Crankcase oil level too low. 4. Unusually dusty environment. 5. Extension cord used. 6. Unit not on level surface. 1. Loose fittings. 2. Compressor not large enough for job. 1. Crankcase overfilled with oil or oil is incorrect thickness or type. 2. Crankcase oil level too low. 3. Loose or damaged belt guard. 4. Loose fittings. 5. Unit not on level surface. Too much moisture in air. 1. Crankcase oil too thin or crankcase overfilled with oil. 2. Crankcase vents clogged. Safety valve needs service. Loose fittings. Defective or rusted tank. Likely Solutions 1. Check inlet and outlet filters. Clean and/or replace as needed. 2. Drain oil and refill to proper level with recommended oil. 3. Add oil to proper level, check for leaks. 4. Clean and/or replace filters more often or move unit to cleaner environment. 5. Eliminate extension cord. 6. Reposition unit on a level surface. 1. Reduce air pressure, then check all fittings with a soap solution for air leaks and tighten as needed. Do not overtighten. 2. Check if accessory CFM is met by Compressor. If Compressor doesn't reach accessory CFM, you need a larger Compressor. 1. Drain oil and refill to proper level with recommended oil. 2. Add oil to proper level, check for leaks. 3. Replace belt guard. 4. Reduce air pressure, then check all fittings with a soap solution for air leaks and tighten as needed. Do not overtighten. 5. Reposition unit on a level surface. Install inline air filter/dryer, and/or relocate to less humid environment. 1. Drain oil and refill to proper level with recommended oil. 2. Clean Crankcase vents. Pull on test ring of safety valve. If it still pops, replace. Reduce air pressure, then check all fittings with a soap solution for air leaks and tighten as needed. Do not overtighten. Have tank replaced by a qualified technician. Drain moisture from tank daily to prevent future corrosion. Follow all safety precautions whenever diagnosing or servicing the compressor. Disconnect power supply before service. OPERATION MAINTENANCE PLEASE READ THE FOLLOWING CAREFULLY THE MANUFACTURER AND/OR DISTRIBUTOR HAS PROVIDED THE PARTS LIST AND ASSEMBLY DIAGRAM IN THIS MANUAL AS A REFERENCE TOOL ONLY. NEITHER THE MANUFACTURER OR DISTRIBUTOR MAKES ANY REPRESENTATION OR WARRANTY OF ANY KIND TO THE BUYER THAT HE OR SHE IS QUALIFIED TO MAKE ANY REPAIRS TO THE PRODUCT, OR THAT HE OR SHE IS QUALIFIED TO REPLACE ANY PARTS OF THE PRODUCT. IN FACT, THE MANUFACTURER AND/OR DISTRIBUTOR EXPRESSLY STATES THAT ALL REPAIRS AND PARTS REPLACEMENTS SHOULD BE UNDERTAKEN BY CERTIFIED AND LICENSED TECHNICIANS, AND NOT BY THE BUYER. THE BUYER ASSUMES ALL RISK AND LIABILITY ARISING OUT OF HIS OR HER REPAIRS TO THE ORIGINAL PRODUCT OR REPLACEMENT PARTS THERETO, OR ARISING OUT OF HIS OR HER INSTALLATION OF REPLACEMENT PARTS THERETO. Item 61454 For technical questions, please call 1-800-444-3353. Page 17
-
 1
1 -
2
-
3
-
4
-
5
-
6
-
7
-
8
-
9
-
10
-
11
-
 12
12 -
 13
13 -
 14
14 -
 15
15 -
 16
16 -
 17
17 -
 18
18 -
 19
19 -
 20
20
 |
 |
