Harbor Freight Tools 61614 User Manual
Harbor Freight Tools 61614 - 22 HP V-Twin Horizontal Shaft Gas Engine EPA Manual
 |
View all Harbor Freight Tools 61614 manuals
Add to My Manuals
Save this manual to your list of manuals |
Harbor Freight Tools 61614 manual content summary:
- Harbor Freight Tools 61614 | User Manual - Page 1
Manual & Safety Instructions Save This Manual Keep this manual for the safety warnings and precautions, assembly, operating, inspection, maintenance and cleaning procedures. Write the product's serial number in the back of the manual our technical support at: productsupport assembly and service may - Harbor Freight Tools 61614 | User Manual - Page 2
Contents Specifications 2 Safety 3 Setup 6 Operation 16 Maintenance 20 Troubleshooting 24 Warranties 26 Parts Lists and Diagrams 28 Specifications Displacement , refer to the last pages of this manual. OpERATION MAINTENANCE Page 2 For technical questions, please call 1-888-866-5797. - Harbor Freight Tools 61614 | User Manual - Page 3
WARNING! Read all instructions. Failure to follow all instructions listed below may result in fire, serious injury and/or DEATH. The warnings and precautions discussed in this manual cannot cover all possible conditions and situations that may occur. It must be understood by the operator - Harbor Freight Tools 61614 | User Manual - Page 4
, heavy-duty work gloves, and dust mask/respirator during set up. 6. Use only lubricants and fuel recommended in the Specifications chart of this manual. 7. Fuel tank must be designed specifically for containing gasoline and must be mounted to a stable mounting frame. Some areas may have specific - Harbor Freight Tools 61614 | User Manual - Page 5
of the equipment is maintained. Do not attempt any service or maintenance procedures not explained in this manual or any procedures that you are uncertain about your in the air. SAVE THESE INSTRUCTIONS. OpERATION MAINTENANCE ITEM 61614 For technical questions, please call 1-888-866-5797. Page - Harbor Freight Tools 61614 | User Manual - Page 6
IMpORTANT SAFETY INFORMATION section at the beginning of this manual including all text under subheadings therein before set up or ENGINE ON A VEHICLE. WARNING! INSTALL THIS ENGINE ACCORDING TO EQUIpMENT INSTRUCTIONS BEFORE USE. SETUp OpERATION MAINTENANCE Page 6 For technical questions, please - Harbor Freight Tools 61614 | User Manual - Page 7
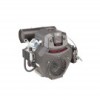
SAFETY Components and Controls Oil Fill plug Lifting Bracket Spark plug (1 of 2) Muffler SETUp OpERATION Dipstick Starter Air Cleaner Lifting Bracket Spark plug (2 of 2) Radiator ITEM 61614 For technical questions, please call 1-888-866-5797. Choke Switch Throttle Circuit Breaker Page 7 - Harbor Freight Tools 61614 | User Manual - Page 8
SAFETY High Altitude Operation Above 3000 feet WARNING! TO pREVENT SERIOUS INJURY FROM FIRE: Follow instructions in a well-ventilated area away from ignition sources. If the engine is hot from use, shut the engine off and wait for it to cool - Harbor Freight Tools 61614 | User Manual - Page 9
SAFETY SETUp 5. Remove the Air Cleaner Top Cover (142b) and internal Air Cleaner components (Spacer, Foam and Paper Filters (142c-142e)). See Figure C. Air Cleaner Top Cover (142b) 9. Remove the four Shroud Nuts (99) and the two Flange Shoulder Bolts (112) from the Shroud (100). The Flange - Harbor Freight Tools 61614 | User Manual - Page 10
SAFETY 11. WARNING! TO pREVENT SERIOUS INJURY FROM FIRE, BEFORE CONTINUING: a. Make sure that the work area is well-ventilated and that there are no ignition sources. b. Have multiple class ABC fire extinguishers available. c. Double-check that fuel hose leading from fuel tank to Fuel Filter is - Harbor Freight Tools 61614 | User Manual - Page 11
SAFETY 19. At the front of the Carburetor, remove the Bolt (38) holding the Fuel Pump Bracket (40) in place. See Figure K. Fuel pump Bracket (40) 20. Underneath where the Fuel Pump Bracket was, the Solenoid Valve (138) is connected. Note the location of the green wire and green dot on the - Harbor Freight Tools 61614 | User Manual - Page 12
SAFETY SETUp 23. Hold the fuel drain port over a bowl, and open the Carburetor Drain Plug (137a) to allow fuel to drain out of that port. Once the carburetor is empty, close the Carburetor Drain Plug. See Figure M. 26. Use a carburetor screwdriver (sold separately) to remove the Left Main Jet and - Harbor Freight Tools 61614 | User Manual - Page 13
SAFETY Reassembly Note: Reassembly step references shown in brackets. 1. Replace the Outer and Inner Bowl O-rings (137d, 137e) with the replacements from the altitude kit. Do not reuse existing O-rings. Inner Bowl O-ring Outer Bowl O-ring Carburetor Bowl Figure p: Replace Bowl O-rings 2. Assemble - Harbor Freight Tools 61614 | User Manual - Page 14
SAFETY Battery Setup Instructions 1. Place a fully charged, lead-acid 12 volt, 36 Ah battery (not included) in a stable, flat location near the engine. solenoid on Starter (164) 2. Only use - Harbor Freight Tools 61614 | User Manual - Page 15
SAFETY Fuel Tank Setup Instructions 1. If possible, incorporate a fuel shutoff valve on the fuel hose (neither included). 2. WARNING! Fuel tank (not included) must be designed specifically for containing gasoline and - Harbor Freight Tools 61614 | User Manual - Page 16
section at the beginning of this manual including all text under subheadings therein before set up or use of this product. pre-Start Checks Inspect engine and equipment looking for damaged, loose, and missing parts before set up and starting. If any problems are found, do not use equipment - Harbor Freight Tools 61614 | User Manual - Page 17
SAFETY Checking and Filling Fuel WARNING! TO pREVENT SERIOUS INJURY FROM FIRE: Fill the fuel tank in a well-ventilated area away from ignition sources. If the engine is hot from use, shut the engine off and wait for it to cool before adding fuel. Do not smoke. 1. Clean the fuel cap and the area - Harbor Freight Tools 61614 | User Manual - Page 18
SAFETY Starting the Engine Before starting the engine: a. Follow the Set Up Instructions in this manual to prepare the engine. b. Follow the Set Up Instructions in the equipment manual to prepare the equipment. c. Inspect the equipment and engine. d. Fill the engine with the proper amount and type - Harbor Freight Tools 61614 | User Manual - Page 19
. c. Close the Fuel Valve, if equipped. NOTICE Drain fuel at end of season or warranty is void. See Storage on page 23 for complete storage instructions. ITEM 61614 For technical questions, please call 1-888-866-5797. Page 19 MAINTENANCE OpERATION SETUp SAFETY - Harbor Freight Tools 61614 | User Manual - Page 20
not use damaged equipment. If abnormal noise, vibration, or excess smoking occurs, have the problem corrected before further use. Follow all service instructions in this manual. The engine may fail critically if not serviced properly. Many maintenance procedures, including any not detailed in this - Harbor Freight Tools 61614 | User Manual - Page 21
SAFETY SETUp Checking and Filling Fuel WARNING! TO pREVENT SERIOUS INJURY FROM FIRE: Fill the fuel tank in a well-ventilated area away from ignition sources. If the engine is hot from use, shut the engine off and wait for it to cool before adding fuel. Do not smoke. 1. Clean the fuel cap and the - Harbor Freight Tools 61614 | User Manual - Page 22
SAFETY Air Filter Maintenance 1. Remove the Air Cleaner Top Cover and the air filter elements and check for dirt. Clean or replace as described below. 2. Clean Paper Air Filter: To prevent injury from dust and debris, wear ANSI-approved safety goggles, NIOSH-approved dust mask/respirator, and - Harbor Freight Tools 61614 | User Manual - Page 23
SAFETY Storage When the equipment is to remain idle for longer than 20 days, prepare the engine for storage as follows: 1. CLEANING: Wait for engine to cool, then clean engine with dry cloth. NOTICE: Do not clean using water. The water will gradually enter the engine and cause rust damage. Apply a - Harbor Freight Tools 61614 | User Manual - Page 24
SAFETY SETUp Troubleshooting problem possible Causes Engine will not start FUEL RELATED: 1. No fuel in does not remedy problem, replace head gasket. 4. Have qualified technician adjust/ repair valves and tappets. Follow all safety precautions whenever diagnosing or servicing the equipment or - Harbor Freight Tools 61614 | User Manual - Page 25
spark timing, deposit buildup, worn engine, or other mechanical problems. 1. Impure or low quality gasoline. 2. Engine too cold oil before EVERY use. 3. Test/replace fuel tank cap. 4. Have qualified technician service magneto. 5. Secure spark plug caps. 6. Allow starter motor to cool, then press - Harbor Freight Tools 61614 | User Manual - Page 26
for the performance of the required maintenance listed in your Owner's Manual. HFT recommends that you retain all receipts covering maintenance on your a HFT warranty station as soon as a problem exists. Contact the HFT Customer Service department at the number below to make shipping arrangements - Harbor Freight Tools 61614 | User Manual - Page 27
warranty station authorized by HFT. For emissions warranty service, contact the HFT Customer Service Department at 1-888-866-5797. Component parts which due to failure to follow the maintenance and operating instructions set forth in the Owner's Manual including, but not limited to: a) Use of parts - Harbor Freight Tools 61614 | User Manual - Page 28
90 Spring, Valve 4 144 Intake Cover 1 25 Breather Plate 1 91 Guide, Seal 4 145 Intake Screen 1 26 Breather Gasket 1 92 Retainer, Valve 180 Motor Control Box 1 60 O-Ring 1 126 Bolt 2 181 Control Box Support 1 61 Bolt 2 127 Voltage Regulator Insulator 1 182 Bolt 2 62 Bolt - Harbor Freight Tools 61614 | User Manual - Page 29
MAINTENANCE OpERATION SETUp SAFETY Page 29 Assembly Diagram For technical questions, please call 1-888-866-5797. 14 1 15 13 3 142a 142 1 2 3 187 183 5 5 12 4 12 5 5 12 55 55 4 12 6 88 7 11 8 8 11 9 10 9 9 10 9 11 142b 142c 143 146 142f 143 144 145 146 142d - Harbor Freight Tools 61614 | User Manual - Page 30
SAFETY Mounting Hole Diagram Note: Not to scale. 7.7" / 195.5mm 4.625" / 117.5mm ~4" / 102mm 4" / 101.5mm 3.375" / 86mm 2x 0.47" / 12mm 4x 0.47" / 12mm SETUp OpERATION MAINTENANCE Page 30 For technical questions, please call 1-888-866-5797. ITEM 61614 - Harbor Freight Tools 61614 | User Manual - Page 31
3/8" - 24UNF 1.3" / 34mm SAFETY 0.86" / 21.8mm SETUp power Take-Off Diagram Note: Not to scale. 9x 0.43" / 11mm Ø5.75" / 146mm 2.84" / 72.2mm 2.375" / 60.5mm 0.72" / 18.3mm 0.2" / 5mm 1.1" / 28mm 1.4" / 36mm pTO 0.25" / 6.3mm 1" / 25.4mm 5.3" / 135mm 4x 5/16" - 24UNF 4x 3/8" - 16UNC 4x 7/ - Harbor Freight Tools 61614 | User Manual - Page 32
3491 Mission Oaks Blvd. • pO Box 6009 • Camarillo, CA 93011 • 1-888-866-5797
-
 1
1 -
 2
2 -
 3
3 -
 4
4 -
 5
5 -
 6
6 -
 7
7 -
8
-
9
-
10
-
11
-
12
-
13
-
14
-
15
-
16
-
17
-
18
-
19
-
20
-
21
-
22
-
23
-
24
-
25
-
26
-
27
-
28
-
29
-
30
-
31
-
32
 |
 |

Visit our website at: http://www.harborfreight.com
Email our technical support at: [email protected]
REV 14e
Using an engine indoors
CAN KILL YOU IN MINUTES.
Engine exhaust contains carbon monoxide.
This is a poison you cannot see or smell.
NEVER use inside
a home or garage,
EVEN IF doors and
windows are open.
Only use OUTSIDE
and far away from
windows, doors,
and vents.
Owner’s Manual & Safety Instructions
Save This Manual
Keep this manual for the safety warnings and precautions, assembly,
operating, inspection, maintenance and cleaning procedures.
Write the product’s serial number in the
back of the manual near the assembly diagram (or month and year of purchase if product has no number).
Keep this manual and the receipt in a safe and dry place for future reference.
When unpacking, make sure that the product is intact
and undamaged.
If any parts are missing or broken,
please call 1-888-866-5797 as soon as possible.
Copyright
©
2013 by Harbor Freight Tools
®
.
All rights reserved.
No portion of this manual or any artwork contained herein may be reproduced in
any shape or form without the express written consent of Harbor Freight Tools.
Diagrams within this manual may not be drawn proportionally.
Due to continuing
improvements, actual product may differ slightly from the product described herein.
Tools required for assembly and service may not be included.
Read this material before using this product.
Failure to do so can result in serious injury.
SAVE THIS MANUAL.