Harbor Freight Tools 61614 User Manual - Page 13
Reassembly
 |
View all Harbor Freight Tools 61614 manuals
Add to My Manuals
Save this manual to your list of manuals |
Page 13 highlights
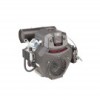
SAFETY Reassembly Note: Reassembly step references shown in brackets. 1. Replace the Outer and Inner Bowl O-rings (137d, 137e) with the replacements from the altitude kit. Do not reuse existing O-rings. Inner Bowl O-ring Outer Bowl O-ring Carburetor Bowl Figure p: Replace Bowl O-rings 2. Assemble the Carburetor Bowl using four Carburetor Bowl Bolts. [#25] Assemble Carburetor Intake Elbow to Intake using Bolts. [#21] 3. Attach Solenoid Valve connector, line up green wire with the green dot on the connector. [#20] 4. Attach Fuel Pump Bracket to front of intake using Bolt. Gently lift the Bracket after assembly to ensure proper alignment. [#19] 5. Attach the Choke Rod on the right side of the Carburetor, and secure it with its Clip. [#17,18] 6. Attach the Breather Hose to the Carburetor, and secure it with its Clamp. [#16] 7. Attach the Throttle Rod Spring to the Throttle Rod Clip on the left side of the Carburetor. [#15] 8. Insert the Throttle Rod on the left side of the Carburetor, and secure it with its Clip. [#14] 9. Attach the Fuel Hose to the port at the top of the Carburetor and attach it using its Clamp. [#12] 10. Install Shroud using four Shroud Bolts and two Flange Shoulder Bolts. [#9,10] Include the Lifting Bracket in place on the right Flange Shoulder Bolt. 11. Install Air Cleaner Base using two Air Cleaner Base Bolts. Connect Fuel Filter Clip under left side of Air Cleaner Base. Install the Intake Cover and Intake Screen using the Intake Cover Bolts. [#6-8] 12. Place the Paper Air Filter, Foam Air Filter, Air Cleaner Spacer, and Air Cleaner Top Cover into place on the Air Cleaner Base. [#5] 13. Replace the Air Cleaner Front Cover. [#4] 14. Use the Air Cleaner Top Knob and Air Cleaner Front Knobs to secure the Covers in place. [#3] 15. Once all connections are secure, open fuel valve/unclamp fuel hose. 16. Wipe up any spilled fuel and allow excess to evaporate before starting engine. To prevent FIRE, do not start the engine while the smell of fuel hangs in the air. SETUp OpERATION MAINTENANCE ITEM 61614 For technical questions, please call 1-888-866-5797. Page 13
-
 1
1 -
2
-
3
-
4
-
5
-
6
-
7
-
 8
8 -
 9
9 -
 10
10 -
 11
11 -
 12
12 -
 13
13 -
 14
14 -
 15
15 -
 16
16 -
 17
17 -
 18
18 -
19
-
20
-
21
-
22
-
23
-
24
-
25
-
26
-
27
-
28
-
29
-
30
-
31
-
32
 |
 |
