Harbor Freight Tools 61849 User Manual - Page 9
Safety, Maintenance, Basic Welding, Welding Tips, Setup
 |
View all Harbor Freight Tools 61849 manuals
Add to My Manuals
Save this manual to your list of manuals |
Page 9 highlights
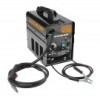
SAFETY SETUP BASIC WELDING .030″ 6. Turn the Feed Tensioner counterclockwise to loosen it enough to pull it up, releasing tension. Swing the Feed Swing Arm out. Note: Do not loosen the Feed Tensioner too much, or it will come apart. 7. Loosen and remove the Feed Knob. Compare the wire diameter marked on the Wire Spool with the stamped number on the top of the Feed Roller. The Roller's groove size must be compatible with the wire diameter. Flip the Feed Roller as needed and confirm that the number facing up is the same as the wire diameter on the Spool. Replace and secure the Feed Knob. .030″ Feed Swing Arm Feed Tensioner Feed Knob Feed Roller .030″ IMPORTANT: Securely hold onto the end of the welding wire and keep tension on it during the following steps. If this is not done, the welding wire will unravel and create a tangled "bird's nest", wasting wire. 8. Cut off all bent and crimped wire. Make sure that the cut end has no burrs or sharp edges; cut again if needed. 9. Keep tension on the wire and guide at least 12 inches of wire into the Wire Liners. 10. Swing the Feed Swing Arm closed, and swing the Feed Tensioner across the tip of the Arm, to latch it. Make sure the Welding Wire is resting in the top groove of the Feed Roller, then turn the Feed Tensioner clockwise a couple of turns. After the wire is held by the Feed Tensioner, you may release it. Wire Liner Feed Swing Arm .030″ .030″ HOLD WIRE SECURELY welding wire leader wire liner Wire Spool Feed Tensioner .030″ 11. Pull the Nozzle to remove it. 12. Turn the Contact Tip counterclockwise and remove. 13. Lay the Gun Cable out in a straight line so that the wire moves through it easily. Leave the cover open, so that the feed mechanism can be observed. Nozzle Contact Tip Gun WELDING TIPS MAINTENANCE Item 61849 For technical questions, please call 1-888-866-5797. Page 9
-
 1
1 -
2
-
3
-
 4
4 -
 5
5 -
 6
6 -
 7
7 -
 8
8 -
 9
9 -
 10
10 -
 11
11 -
 12
12 -
 13
13 -
 14
14 -
15
-
16
-
17
-
18
-
19
-
20
-
21
-
22
-
23
-
24
-
25
-
26
-
27
-
28
 |
 |
