Harman Kardon AVR 1565 Owners Manual - Page 16
Harman Kardon AVR 1565 Manual
 |
View all Harman Kardon AVR 1565 manuals
Add to My Manuals
Save this manual to your list of manuals |
Page 16 highlights
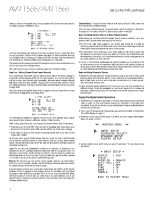
AVR 1565/AVR 1566 Program the Remote to Control Your Source Devices and TV In addition to using the remote to control the AVR itself and the AM/FM radio, you can program the remote to control up to nine additional audio/video source devices plus your TV. Once you have programmed the remote, you can switch the remote's control mode to access the functions for a particular source device by pressing the remote's Source Selector button for that device. To control the AVR, press the remote's AVR button. Before you begin programming the remote, review the connections you filled in on the Input Connections and Source Buttons table on page 13. The Source Selector buttons are assigned to the components that you listed in the table's "Source Device Connected" column. 1. Turn on the source device you want to program the remote to control. 2. Look up the code numbers for the device in Tables A11 - A17 in the Appendix. Write all the applicable code numbers in a convenient place. 3. Press and hold the Source Selector button for that source device until the Program Indicator LED on the remote starts to flash, then release it. (This procedure places the remote in the Programming mode.) NOTE: If you're programming one of the four HDMI source buttons, after pressing the HDMI button you must also press the Source Selector button for the type of device that will be controlled: • Press DVD to control a DVD player. • Press VID1 to control a VCR, DVR or Harman Kardon digital media center. • Press VID2 to control a cable or satellite set-top box. 4. Aim the remote at the source device and use the remote's Number buttons to enter a code number from Step 2, above. a) If the device turns off, press the Source Selector button again to save its code. The Source Selector button will flash, and the remote will exit the Programming mode. b) If the device does not turn off, enter another code number. c) If you run out of code numbers for a device, you can search through all of the codes in the remote's library for devices of its type by pressing the Up or Down button repeatedly until the device turns off. When it does, press the Source Selector button to save the code. 5. Check that other functions control the device correctly. Sometimes manufacturers use the same Power code for several models, while other function codes vary. Repeat this process until you've programmed a satisfactory code set that operates most of the device's functions. 6. If you searched through the remote's code library to find the code, you can find out which code number you have programmed by pressing and holding the Source Selector button to re-enter the Programming Mode. Then press the remote's OK button, and the Program Indicator LED will flash in the code sequence. One flash represents "1," two flashes represent "2," and so forth. A series of quick flashes represents "0." Record the code number programmed for each device in Table A7 in the Appendix. Repeat Steps 3 - 6 for each source device you want to control with the AVR remote. In general, the label for each button on the remote describes the button's function when used to control the AVR. However, the button may perform a very different function when used to control another device. Refer to the Remote Control Function List, Table A10 in the Appendix, for each button's functions with the various product types. You can also program the remote to perform Macros (preprogrammed code sequences that execute many code commands with a single button press) and "punch-through" programming (allowing the remote to operate a device's channel or transport controls when the remote is in another device's mode). See Advanced Remote Control Programming, on page 22, for instructions on these functions. Set Up the Remote Control, continued, and Set Up the AVR Set Up the AVR Turn On the AVR 1. Set the rear-panel Main Power switch to "On." (The front-panel Power indicator will glow amber.) 2. Press the front-panel Power button. Main Power Switch Power Button Unless you will not be using the AVR for an extended period of time, leave the Main Power switch set to "On." When the Main Power switch is turned off, any settings you have programmed will be preserved for up to four weeks. IMPORTANT NOTE: If the PROTECT message ever appears in the Message display, turn off the AVR and unplug it. Check all speaker wires for a short circuit ("+" and "-" wires touching). If none is found, bring the unit to an authorized Harman Kardon service center for inspection and repair before using it again. Using the On-Screen Menu System Although it's possible to configure the AVR using only the remote and the front-panel Message display, it is easier to use the on-screen menu system. To access the menu system, press the OSD button on the remote. The Master menu will appear. ** MASTER MENU ** INPUT SETUP SURROUND SELECT SPEAKER SETUP SYSTEM SETUP The Master menu consists of four submenus: Input Setup, Surround Mode, Manual Setup and System Setup. Use the Up/Down/Left/Right buttons on the remote to navigate the menu system, and press the OK button to select a menu or setting line, or to enter a new setting. The current menu, setting line or setting will appear in the front-panel Message display, as well as on screen. To return to the previous menu, navigate to the "Back to Master Menu" line and press the OK button. To exit the menu system, press the OSD button. Most users should follow the instructions in this Set Up the AVR section to configure a basic home theater system. You may return to these menus at any time to make additional adjustments, such as those described in the Advanced Functions section, on pages 20 through 23. Before you begin initial setup, all loudspeakers, a video display and all source devices should be connected to the AVR. You should be able to turn on the AVR and view the Master menu when you press the OSD button. If necessary, reread the Making Connections section and the beginning of this section before continuing. 16
-
 1
1 -
2
-
3
-
4
-
5
-
6
-
7
-
8
-
9
-
10
-
 11
11 -
 12
12 -
 13
13 -
 14
14 -
 15
15 -
 16
16 -
 17
17 -
 18
18 -
 19
19 -
 20
20 -
 21
21 -
22
-
23
-
24
-
25
-
26
-
27
-
28
-
29
-
30
-
31
-
32
-
33
-
34
-
35
-
36
-
37
-
38
-
39
-
40
-
41
 |
 |
