Harman Kardon AVR 347 Owners Manual - Page 49
Default Modes - reset
 |
View all Harman Kardon AVR 347 manuals
Add to My Manuals
Save this manual to your list of manuals |
Page 49 highlights
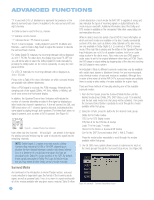
ADVANCED FUNCTIONS Press the Set Button to access the Surround Setup menu, as shown in Figure 86. With the Surround Mode highlighted, press the Set Button to change the surround mode group. Use the ‹/› Buttons to scroll through the options, and press the Set Button when the desired mode group appears. Navigate to the Mode line and follow the same procedure to select an individual mode. The Upsampling setting is only available for the Dolby modes. You may wait for the full-OSD screen to time out and disappear from view, or press the ‹ Button to return to the menu tabs and select another menu. Dolby Surround Settings Some additional settings are available for Dolby modes. Three settings are active only when the Dolby Pro Logic II or IIx Music modes have been selected. See Figure 88. Figure 88 - Dolby Settings CENTER WIDTH: This setting affects how vocals sound through the three front speakers. A higher number (up to 7) focuses the vocal information tightly on the center channel. Lower numbers broaden the vocal soundstage across the three speakers. DIMENSION: This setting affects the depth of the surround presentation, allowing you to "move" the sound toward the front or rear of the room. The setting of "0" is a neutral default. Setting "F-3" moves the sound mostly toward the front of the room, while setting "R-3" moves the sound mostly toward the rear. PANORAMA: With the Panorama mode turned ON, some of the sound from the front speakers is moved to the surround speakers, creating an enveloping "wraparound" type of effect. UPSAMPLING: The last line of the Surround Setup menu activates upsampling, only available with the Dolby Pro Logic II/IIx Movie, Dolby Pro Logic II/IIx Music and Dolby Pro Logic modes. Normally set to OFF, upsampling, when activated, processes digital sources at a higher resolution for improved sound quality. This feature can be useful to eliminate distortion in some low-resolution sources. OFF: At this setting, there is no compression, as the Night mode is deactivated. MID: A mild compression is applied. MAX: More compression is applied. We suggest that you experiment with the modes to find a setting that meets your needs. The Night mode is not adjusted using the full-OSD menu system. With a Dolby Digital program encoded with Night mode playing, press the Night Button on the remote. Each press of the button will cycle through the three settings, with the selected setting being displayed on the front panel and in the semi-OSD display. Default Modes During initial use or after a processor reset, the AVR 347 will default to the Logic 7 7CH Music mode for all analog and PCM audio inputs. Subsequently, when a source input is selected and an analog or PCM signal is received, the AVR will switch to the last surround mode used for that source input/incoming signal combination. Whenever a multichannel Dolby Digital or DTS signal is detected, the AVR 347 will automatically switch to that mode, unless the Default Surround Mode setting in the System Setup menu has been changed to OFF. You may observe that other surround modes are available for use with the multichannel digital bitstreams. If you would prefer the AVR 347 to use one of those alternate modes any time the same digital signal is detected, then select that mode while the multichannel bitstream is present, and then change the Default Surround Mode setting in the System Setup menu to OFF. Table 8 provides descriptions of all surround modes available on the AVR 347, along with the incoming bitstreams or signals that the particular mode may be used with. Feel free to experiment and simply cycle through all of the available modes at any time; you cannot cause any problems for the AVR 347 by doing so. NOTE: In order to access 6.1- and 7.1-channel modes, such as Dolby Digital EX, DTS-ES, Logic 7 (7.1 modes), DTS Neo:6 (6.1 modes), the 6-channel implementations of Hall 1, Hall 2 and Theater and 7-channel Stereo, you must enable the surround back channels as explained in the Manual Setup section. You should not enable these channels if you don't have surround back speakers in your system. Night Mode Night mode is available with some Dolby Digital programs, if it has been encoded in the material. It compresses the peak sound levels, maintaining the intelligibility of the dialogue and quieter passages, while reducing the loudness of special effects and louder passages to avoid disturbing others. Three levels of compression are available: 49
-
 1
1 -
2
-
3
-
4
-
5
-
6
-
7
-
8
-
9
-
10
-
11
-
12
-
13
-
14
-
15
-
16
-
17
-
18
-
19
-
20
-
21
-
22
-
23
-
24
-
25
-
26
-
27
-
28
-
29
-
30
-
31
-
32
-
33
-
34
-
35
-
36
-
37
-
38
-
39
-
40
-
41
-
42
-
43
-
 44
44 -
 45
45 -
 46
46 -
 47
47 -
 48
48 -
 49
49 -
 50
50 -
 51
51 -
 52
52 -
 53
53 -
 54
54 -
55
-
56
-
57
-
58
-
59
-
60
-
61
-
62
-
63
-
64
-
65
-
66
-
67
-
68
-
69
-
70
-
71
-
72
-
73
-
74
-
75
-
76
 |
 |
