Harman Kardon AVR 347 Owners Manual - Page 54
Speaker Size Menu
 |
View all Harman Kardon AVR 347 manuals
Add to My Manuals
Save this manual to your list of manuals |
Page 54 highlights
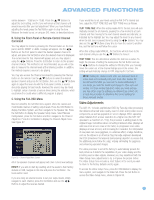
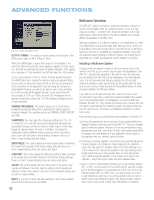
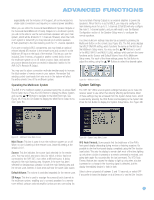
ADVANCED FUNCTIONS Figure 89 - Manual Speaker Setup Menu There are four submenus in the Manual Speaker Setup Menu: Speaker Size, Speaker Crossover, Delay Adjust and Channel Adjust. As each submenu's name is highlighted, its settings will be displayed. To navigate the Manual Speaker Setup menus, press the Set Button when the desired submenu is highlighted, and the first line of the submenu will be highlighted. Press the Set Button to change a setting. Use the ‹/› Buttons to scroll through the options, pressing the Set Button again to select an option. Use the ⁄/¤ Buttons to select another setting in the submenu. When you are finished making all of your adjustments in a particular submenu, press the ‹ Button to return to the list of submenus, and use the ⁄/¤ Buttons to select another submenu. If you have run EzSet/EQ, the values obtained during that process will appear in these menus. You may use them as a starting point for your adjustments, which is recommended, or you may reset the values in the Delay Adjust and Channel Adjust submenus. Each submenu's settings are dependent upon the previous submenu, and therefore we recommend you visit the menus in the order shown. Speaker Size Menu Move the cursor to the Size line and press the Set Button to display the Speaker Size submenu. See Figure 89. The Speaker Size menu lists each of the speaker groups. You will be programming the correct setting for each group, indicating how many speakers are in your system and what their capabilities are, based on the information you obtained in Step One - Determine Speaker Size. Each of the main speaker groups can be set to one of three settings: LARGE, SMALL or NONE. These settings don't refer to the physical size of the speaker, but rather to its frequency range. These may or may not turn out to be the same. If the lower number of the frequency response for your speakers is less than 100Hz, choose the LARGE setting. If this number is 100Hz or greater, choose the SMALL setting. If you don't have a speaker installed in that position, choose NONE. You may record the speaker size setting in Table A5 in the appendix. As you can see, the system requires you to use both speakers in a pair. For example, you can't connect just a front left speaker without a right speaker, or just a right surround (rear) speaker without a left one. However, you can connect only the front speakers, or both front and surround speakers without a center, or the front left/right and center speakers without any surrounds. 54 Usually you would not connect the surround back speakers without also connecting the front and side surround speakers. However, the AVR 347 has the capability to reassign the surround back amplifier channels to the multiroom system, enabling you to use these channels to power a pair of speakers in another room independently of the speakers you use in your main listening area. In that case you might connect speakers to the surround back/multiroom terminals without using the side surround speaker terminals at all. LEFT/RIGHT: This line tells the AVR 347 the capabilities of your front left and right speakers. Use the ‹/› Buttons to select either SMALL or LARGE for these speakers. CENTER: Move the cursor to the line for the center speaker, and use the ‹/› Buttons to select a setting for this speaker. NOTE: If the receiver is currently in one of the Logic 7 surround modes, which will be the case the first time you turn on the receiver, you won't be able to set the center speaker to LARGE, due to the requirements of the Logic 7 processor. You may use the SMALL setting instead. As you listen to the receiver, if you find the SMALL setting is not satisfactory, change the surround mode to one of the Dolby Pro Logic II modes (using the Surround Setup menu, and return to this menu to change the center speaker to the LARGE setting. SURROUND: Move the cursor to the line for the side surround speakers, and use the ‹/› Buttons to select the SMALL, LARGE or NONE setting for these two speakers. SURR BACK: Use the ‹/› Buttons to select the SMALL, LARGE or NONE setting for the surround back speakers. The AVR 347 is one of the few receivers in its class to include multiroom capability. With assignable surround back amplifier channels, setting up a multiroom system is more convenient than ever, no longer requiring an external amplifier to power the remote speakers. This line indicates whether the surround back channels are in use with the multiroom system by indicating MAIN when the multiroom system is not in use and MULTI when it is. It is not possible to change the status of the surround back channels from this menu; the MAIN/MULTI indication is for information only. The status may only be changed by activating or deactivating the multiroom system using the MULTI ROOM SETUP menu as described in the Multiroom Operation section on page 58. SUBWOOFER: Move the cursor to the line for the subwoofer, which is programmed a little differently. The subwoofer's "size" setting depends upon how you programmed the front left and right speakers. • If you set the front speakers to SMALL, the subwoofer setting will be SUB (LFE), and you won't be able to change it. All low-frequency information will always be sent to the subwoofer. If you don't have a subwoofer, you may wish to set your front speakers to LARGE so as not to lose this information, but you may need to lower the volume to avoid adverse results. We recommend that you either upgrade to full-range speakers or add a subwoofer to your system at the earliest opportunity. 54
-
 1
1 -
2
-
3
-
4
-
5
-
6
-
7
-
8
-
9
-
10
-
11
-
12
-
13
-
14
-
15
-
16
-
17
-
18
-
19
-
20
-
21
-
22
-
23
-
24
-
25
-
26
-
27
-
28
-
29
-
30
-
31
-
32
-
33
-
34
-
35
-
36
-
37
-
38
-
39
-
40
-
41
-
42
-
43
-
44
-
45
-
46
-
47
-
48
-
 49
49 -
 50
50 -
 51
51 -
 52
52 -
 53
53 -
 54
54 -
 55
55 -
 56
56 -
 57
57 -
 58
58 -
 59
59 -
60
-
61
-
62
-
63
-
64
-
65
-
66
-
67
-
68
-
69
-
70
-
71
-
72
-
73
-
74
-
75
-
76
 |
 |
