Harman Kardon AVR 3600 Owners Manual - Page 11
Front, Center and Surround Speaker Outputs - z a v receiver
 |
View all Harman Kardon AVR 3600 manuals
Add to My Manuals
Save this manual to your list of manuals |
Page 11 highlights
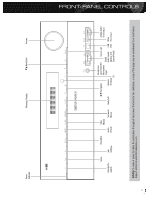
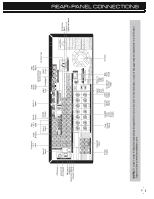
REAR - PANEL CONNECTIONS Component Video Monitor Outputs: If you are using one of the Component Video Inputs and your television or video display is component-video-capable (but does not have an HDMI input), connect these jacks to the video display. NOTES: • Due to copy-protection restrictions, there is no output at the Component Video Monitor Outputs for copy-protected sources. • Composite video signals are upscaled to as high as 1080i and available at these outputs. If your video display's best connection is component video, it is the only video connection required from the AVR to the display. AM and FM Antenna Terminals: Connect the included AM and FM antennas to their respective terminals for radio reception. Preamp Outputs: Connect these jacks to an external amplifier if more power is desired. The Surround Back/Zone 2 Preamp Outputs may be used with an external amplifier to power the remote zone of a multizone system. A-BUS Port: Use a Category 5/5e cable to connect this port to optional A-BUS equipment for multizone operation. When the A-BUS system is used, it is possible to have a full 7.1-channel system in the main listening room at the same time the multizone system is in use. Front, Center and Surround Speaker Outputs: Use two-conductor speaker wire to connect each set of terminals to the correct speaker. Remember to observe the correct polarity (positive and negative connections). Surround Back/Zone 2 Speaker Outputs: These speaker outputs are used for the surround back channels in a 7.1-channel home theater, or may be reassigned to a remote room for multizone operation. Switched AC Accessory Outlet: You may plug the AC power cord of one source device into this outlet, and it will turn on whenever you turn on the receiver. Do not use a source that consumes more than 50 watts of power. AC Power Input: After you have made all other connections, plug the AC power cord into this receptacle and into an unswitched wall outlet. 11
-
 1
1 -
2
-
3
-
4
-
5
-
 6
6 -
 7
7 -
 8
8 -
 9
9 -
 10
10 -
 11
11 -
 12
12 -
 13
13 -
 14
14 -
 15
15 -
 16
16 -
17
-
18
-
19
-
20
-
21
-
22
-
23
-
24
-
25
-
26
-
27
-
28
-
29
-
30
-
31
-
32
-
33
-
34
-
35
-
36
-
37
-
38
-
39
-
40
-
41
-
42
-
43
-
44
-
45
-
46
-
47
-
48
-
49
-
50
-
51
-
52
-
53
-
54
-
55
-
56
-
57
-
58
-
59
-
60
-
61
-
62
-
63
-
64
-
65
-
66
 |
 |