Harman Kardon T25 Owners Manual - Page 5
Connecting, Headshell, Cartridge
 |
View all Harman Kardon T25 manuals
Add to My Manuals
Save this manual to your list of manuals |
Page 5 highlights
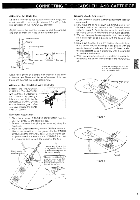
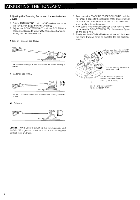
CONNECTING THE HEADSHELL AND CARTRIDGE Attaching the Cartridge Since this turntable is not equipped with a cartridge, use a cartridge wh'oh has a weight between 4.5 and 7 g. Only use car ridges in the HEADSHELL provided. Slightly secure the retaining screws to hold the cartridge and then connect the leads to the cartridge pins. Retaining screw e cf.. .Washer Headsriell Connecting .eads Cti Stylus-- Red lead G, een lead -Cartridge i,i5.1I1,--I-VVhite lead IL° G 0.1 Blue lead Nut Above figure shows an example of connection of the leads to the cartridge. Please read the owner's manual of the cartridge and connect the leads accordingly. Attaching the Headshell with Cartridge Loosen the HEADSHELL I. r CLAMP first. The HEADSHELL I with cartridge is attached to the TONEARM by pushing it I fully in and then tightening the HEADSHELL CLAMP. Do not j I. remove the stylus guard before I you have secured the HEAD- j SHELL in position. Overhang Adjustment 1 Place the accessory TRACKING ANGLE GAUGE on the CENTER SPINDLE and raise the flap. 2. Be sure to remove the stylus guard when adjusting the overhang. 3. Move the TONEARM directly over the CENTER SPINDLE. Line up the raised flap on the gauge with the CENTER SPINDLE and the TONEARM base. Gently move the cartridge backward or forward in the HEADSHELL so that the stylus tip lines up with the corner of the flap. Slightly slacken the retaining screws. ( The flap should be in the same straight line as the axis of the tonearm and as the center spindle. Move the cartridge back2\ ward or forward so that the stylus tip comes orecise.y over the position indicated on the flap. Flap Tracking Angle Adjustment 1. Check to be sure that the overhang adjustment has been completed. 2. Now move the TRACKING ANGLE GAUGE until it is in the same position with respect to the TONEARM as that shown in figure A. Place the stylus over the tracking angle setting point with keeping the stylus guard attached. 3. Without changing the stylus position, turn the cartridge so that its front edge is parallel with the lines on the gauge. 4. Now move it so that it is in the position shown in figure B and check that the cartridge is still parallel with the parallel lines as it was in step 3 above. If it is not parallel, then repeat steps 3 and 4 alternately until the cartridge is parallel in both cases. 5. When the above adjustment is completed, then tighten the screws that attach the cartridge to the HEADSHELL fully. Adjust the cartridge so that the front of the cartridge is parallel with the parallel lines. Tracking angle gauge Figure A Parallel Figure B Parallel 4
-
 1
1 -
 2
2 -
 3
3 -
 4
4 -
 5
5 -
 6
6 -
 7
7 -
 8
8 -
 9
9 -
 10
10
 |
 |
