Harman Kardon TD2 Owners Manual - Page 4
Recording, Procedure
 |
View all Harman Kardon TD2 manuals
Add to My Manuals
Save this manual to your list of manuals |
Page 4 highlights
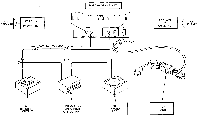
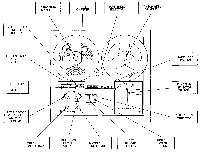
TAPE ON INDICATOR: The TAPE ON indicator, when illuminated, indicates that the Tape Recorder is ON and ready for operation. AUTOMATIC SHUT-OFF SWITCH: This switch is controlled by a wire lever located under the head cover. In STOP position, the shut-off lever recedes into a slot to facilitate easy tape threading. After tape is threaded and the mechanism is placed in either RUN, FAST FORWARD or REWIND mode (FWD, F. FWD, REW), the shut-off lever contacts the tape and is held in this position. If the tape either runs out or breaks, the lever will automatically fall forward and activate a micro switch which stops tape motion. HEAD-COVERS: Protects heads. When cleaning the heads, remove these covers by pulling up. CONNECTING YOUR RECORDER TO AN INTEGRATED RECEIVER The following input and output connections MUST be made to record and to playback, using an integrated receiver. Connect the Left and Right external receiver (EXT. AMP) output jacks of your recorder to the respective tape input jacks of an integrated receiver, using one set of the shielded connecting cable supplied. Similarly, connect the Left and Right Auxiliary (AUX) input jacks of your recorder to their respective tape output jacks of the integrated receiver, using the other set of shielded connector cables that are supplied with the recorder. You may now record the desired program information (FM Stereo, Phono, AM, Tape Amp. Aux., etc.) available through your integrated receiver. THREADING THE TAPE First make sure that the function selector switch is in the STOP position. Then observe the following: 1. Place an empty reel on the "TAKE UP REEL SPINDLE". Rotate the reel slightly until the slot of the reel engages the spindle. 2. Place a full reel of tape on the "SUPPLY REEL SPINDLE". Rotate the reel slightly until the slot of the reel engages the spindle. 3. Unwind approximately 1 12/ feet of tape from the full reel, keeping it taut. The shiny surface of the tape should be facing you. 4. Bring the tape from the left to the right, through the tape path of the HEAD COVER and up to the TAKEUP REEL. 5. Insert the end of the tape into the slot on the empty take-up reel. 6. Holding the tape in the slot with your finger, turn the takeup reel clockwise about two turns until the tape is held firmly in place. The tape is now ready for playing or recording. NOTE: When the recorder is used in a vertical position, use rubber reel caps (supplied) to retain the reels on the recorder. RECORDING PROCEDURE 4-Track Stereophonic Recording: 1) Carefully thread the tape onto the recorder, as outlined in the preceding paragraph "Threading the Tape". 2) Turn the power "ON" for both the tape recorder and your integrated receiver. 3) Place the "function selector" switch for the integrated receiver in the mode appropriate to the material you wish to record. (Example: PHONO STEREO, FM, AM, etc.) NOTE: Since your TD2 (TD3) recorder may be used to record directly from any other external equipment, without using an integrated receiver, please observe these steps for such recording: Connect the output cables of your external equipment (example: AM tuner, tape recorder, etc.) to the proper input jacks of your TD2 (TD3), as illustrated in the input and output connection drawings. 4. Select the tape speed desired by moving the "Tape Speed Selector" lever appropriately. 5. Return the "Tape Counter" to zero by depressing the "Tape Counter Reset Button". 6. Depress and hold down BOTH "record buttons" while simultaneously turning the "Tape Function Selector" to the Run position. The "record buttons" will interlock in the DOWN position and the tape will start moving from the left (supply) reel to the right (take up) reel. 7. Turn the "Function Selector" to the PAUSE position the moment the tape begins to move forward to hold the tape in position while setting the controls for the record function. 8. Rotate the left and right channel "level controls" in a clockwise direction until their meter pointers deflect to the boundary of the red area. If you find the VU meter pointer well into the red area, the recording level is set too high and your recording will be distorted. NOTE: The "record buttons" will be kept interlocked while the "function selector is in RUN or PAUSE position. When the selector is turned to STOP or FAST FORWARD position, the record buttons will be automatically released. 9. After the proper recording levels have been set on both channels, return the "Function Selector" to the RUN position. The recorder will now begin the recording process. To monitor the program information the second after it has been recorded, refer to the paragraph MONITOR VOLUME CONTROLS. 10. If, in process of recording, you want to interrupt the recording to cut out unwanted program material, move the "function selector" to the PAUSE position. To resume recording, place the "function selector" to the RUN position. 11. When you have completed your recording, move the "function selector" to the STOP position. 2
-
 1
1 -
 2
2 -
 3
3 -
 4
4 -
 5
5 -
 6
6 -
 7
7 -
 8
8 -
 9
9 -
 10
10
 |
 |
