Harman Kardon TD2 Owners Manual - Page 9
Harman Kardon TD2 Manual
 |
View all Harman Kardon TD2 manuals
Add to My Manuals
Save this manual to your list of manuals |
Page 9 highlights
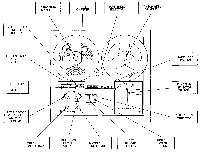
1 8. Reverse and invert the reels as explained in steps 8, 9, and 10. 19. Thread the tape to the recorder to record the last remaining track for 4-track monaural recording, observing the steps outlined above. NOTE: The following shows the monaural track position and track sequence: Track Position Mono Track Sequence Stereo Track 1 (L) 1 Side I Tape Width 2 (R) 4 Side II 3 (R) 3 Side I 4 (L) 2 Side II ERASING TAPE: When the recorder is set in the record mode, the Erase Head will erase the track (or tracks) of the tape for the corresponding tracks of the recording head. Therefore, when you start a new recording, any previous recordings will be automatically erased as the tape passes the erase head. In order to erase a tape without adding a new recording, simply place the recorder in the RECORD MODE and turn the LEFT and RIGHT RECORD LEVEL CONTROLS to their full COUNTERCLOCKWISE position. A faster method of tape erasure is provided by an accessory device, available from your dealer, known as a BULK ERASER. SOUND ON SOUND RECORDING (TD3) This is a method by which you can record for monaural playback, a composite of the left and right channel program material on 1 track of the recording tape. This procedure is commonly called "Dubbing" or "Sound on Sound recording". 1. Set the tape counter to zero and follow the steps 1 through 6, as outlined in the section "4-Track Monaural Recording". 2. When you have completed the recording rewind the tape back to the beginning. 3. Take one end of a shielded patch cord and plug this into the "Left" channel EXT. AMP. output jack of your recorder. Plug the other end of this cable into the Right "AUX" input jack of your recorder. 4. Plug a microphone into the Right channel "MICROPHONE input jack". 5. Rotate the Left channel "MONITOR VOLUME CONTROL" clockwise to about 3 o'clock ("Tape" position). 6. Depress and hold down the Right channel "RECORD BUTTON" and simultaneously turn the "tape Function Selector" to the RUN position. 7. Place a "Headset" into your integrated receiver and turn the speakers for your system OFF. To Monitor the Left channel Prerecorded information rotate the RIGHT channel "MONITOR VOLUME CONTROL" counterclockwise to the SOURCE position. 8. Observe the Right channel "Level Meter" to set and maintain a proper recording level of the composite signal. If the voice level from the microphone is too low, increase the Right channel "Record Level Control". If the record level for the Left channel pre-recorded information is too low or too high this level may be adjusted by turning the left channel "Monitor volume control" (rotating this control clockwise will increase the recording level, rotating counterclockwise will decrease the recording level). Aftr these two levels are set correctly you may perform the "Sound on Sound" recording. 9. When you have completed this recording rewind the tape back to the original position. 10. To playback your Sound on Sound Recording Rotate the "Function Selector" to the RUN position. 11. Rotate the Right channel "Monitor Volume Control to the TAPE position. 12. Turn the speakers for your music system "ON". 13. Adjust the necessary controls of your integrated receiver for monaural operation. SOUND ON SOUND RECORDING (TD2) This is a method by which you can record for Monaural playback, a composite of the left and Right channel program material on 1 track of the recording tape. This procedure is commonly called "Dubbing" or Sound on Sound recording. This method may also be used as an alternate with the Model TD3 recorder. 1. Set the tape counter to zero and follow the steps 1 through 6, as outlined for 4-track monaural recording. 2. When you have completed the recording, rewind the tape back to the beginning. 3. Connect a microphone to the RIGHT microphone input of your tape recorder. 4. Push and hold down the RIGHT channel "record button" and simultaneously move the "function selector" to the PAUSE position". 5. Using the microphone as the second signal source, set the RIGHT channel "Record Level Control" to the proper level, using your corresponding "Level Meter" as a guide. 6. Place the "Function Selector" in the RUN position. You will now be playing back and hearing from your LEFT channel speaker, the previously recorded or (base) material. At the same time, you may now use the microphone to "dub in" on the Right channel. NOTE: While following the above procedure, a portion of the sound or base material coming out of your LEFT channel speaker is picked up by your microphone and re-recorded together with your voice on the RIGHT channel this is called "Sound on Sound". 7. When you have completed this recording rewind the tape back to the original starting position. 8. To playback your "Sound on Sound" recording Rotate the "Function Selector" to the RUN position. 9. Adjust the necessary controls of your integrated receiver to select the RIGHT channel for monaural operation. 7
-
 1
1 -
2
-
3
-
 4
4 -
 5
5 -
 6
6 -
 7
7 -
 8
8 -
 9
9 -
 10
10
 |
 |
