Harman Kardon TD4800 Owners Manual - Page 7
subsequent
 |
View all Harman Kardon TD4800 manuals
Add to My Manuals
Save this manual to your list of manuals |
Page 7 highlights
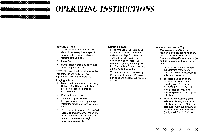
2. Using the Counter. The Linear Time Counter indicates approximate tape position in minutes and seconds. (Elapsed time is maintained in Fast Forward and Rewind.) a. Press Reset to set Counter to 00:00 at start of tape. Use subsequent Counter readings to identify desired points on tape. b. To rewind rapidly to any desired point: (1) Press Reset at desired point (Counter will display 00:00); (2) Press Memory button ("Memo" will be displayed); (3) When 41 is pressed, deck will rewind to approximately 00:00 on Counter. Note: When Counter is reset to 00:00 at the beginning of a cassette, the approximate time remaining can be determined by subtracting the counter reading from the total tape time. Accuracy is typically within one minute of the tape's actual running time. Recording a Tape 1. Set Bias Fine Trim knob, Rec Cal knobs and Dolby NR buttons correctly for this recording. (See "Setting the Recording Circuitry", Pages 7-8.) 2. If you are recording an FM stereo broadcast using Dolby Noise Reduction, turn on MPX Filter. Otherwise turn MPX Filter off. 3. Press 0/11 and ► to begin recording. 4. Play one of the louder segments of the material to be recorded. 5. Check the signal levels indicated by the bars marked L and R on the display. If levels are unequal, correct the imbalance by turning the front part of the Input Level knob, while keeping the back part of the knob stationary. 6. Record level may be set in any of three ways: A. Check the Display Panel to determine the tape Type (I, II or IV). Turn front and back parts of the Input Level knob together to set record level: (1) For tape Types I and II, the loudest material should illuminate the colored bars at +1 or +3dB; (2) For tape Type IV, the loudest material should illuminate the bars at +3 or +5dB. B. Alternatively, turn on Meter Weighting and set Input Level at +3dB. (For details see Page 7.) C. Monitor the recording through headphones or speakers to maintain maximum input level without distortion. 7. Rewind the tape. 8. Return to the beginning of the material to be recorded. 9. Press 11/11 and ► to begin recording. 10. At end of material to be recorded: a. Press ■ (Stop); or b. Press Rec Mute. This records 5 seconds of silence on the tape and returns the deck to Rec/ Pause (0/11 ) for recording additional selections. Automatic Tape Monitor Switching Most 3-head tape decks provide a switch that allows users to select between source signal and tape monitor. The TD4800 automatically switches to the source signal when 0/11 (Record/Pause) is pressed. This enables the user to hear source sound while setting record levels. When recording begins-and when a tape is played-the unit automatically switches to Tape Monitor Mode. To override the automatic setting, press the Monitor button on the front panel. This allows you, for example, to compare the source signal to a tape recording as the recording is being made. 6
-
 1
1 -
 2
2 -
 3
3 -
 4
4 -
 5
5 -
 6
6 -
 7
7 -
 8
8 -
 9
9 -
 10
10 -
 11
11 -
 12
12 -
13
-
14
-
15
 |
 |
