Harman Kardon TDC33 Owners Manual - Page 8
Harman Kardon TDC33 Manual
 |
View all Harman Kardon TDC33 manuals
Add to My Manuals
Save this manual to your list of manuals |
Page 8 highlights
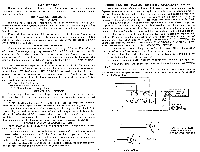
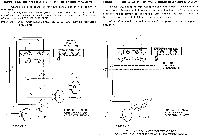
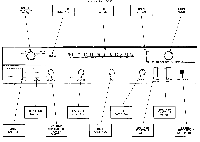
STEREO HEADPHONE RECEPTACLE The stereo headphone receptacle located on the front panel will accept any headphone with any impedance rating. The headphone receptacle is "on" at all times. If you wish to listen to the headphones alone, see the paragraph "Speaker System Selector Switches". CONNECTING THE FM ANTENNA Due to the exceptionally high sensitivity of your receiver, the 48" wire n supplied is sufficient for all but the most difficult locations. The balanced antenna input is designed to accept a 300 antenna, indoor or outdoor type. When using the antenna supplied connect one end of the 48" wire to either of the FM antenna terminals. Horizontal placement of the antenna will yield optimum reception. The antenna may be tacked to the back of the molding behind the equipment or to the shelf you use. As FM signals are in the same broadcast frequency range as TV signals, they are affected by the same external conditions. Just as TV reception is improved, you can improve your FM reception with an external antenna. When using an external antenna connect both leads of the antenna wire to the two FM antenna terminal posts on the rear of your receiver. In more remote locations, an outside Yagi, folded di-pole or omni-directional antenna is recommended. For the greatest gain, an 8 to 14 element Yagi designed for the FM band is suggested. A Yagi however, is very directional and it may be desirable to use an antenna rotor if a full 360° coverage is required. For reception in the suburbs, an outside folded di-pole or omni-directional di-pole is recommended. CONNECTING A 2ND STEREO TAPE RECORDER Connect the two tape recorder output cables to the LEFT and RIGHT AUX input receptacles on the rear of your receiver. With the Function Switch in the AUX position you will now be able to play your stereo tapes. In order to make a recording, connect the inputs of your tape recorder to the TAPE OUT receptacles on the rear of the receiver. This will allow you to make a stereophonic recording while simultaneously listening to the program material through your speaker system. CONNECTING A STEREO RECORD PLAYER - (MAGNETIC PICKUP) Connect both leads from your record player to the CHAN A and CHAN B PHONO input receptacles on the rear of the receiver chassis. If your record player has a special ground wire emerging with the two input leads, connect this ground wire to the ground terminal on the rear of the receiver. CONNECTING A MONOPHONIC RECORD PLAYER - (MAGNETIC PICKUP) Connect the single lead from your monophonic record player to either the A or B PHONO input receptacles on the rear of the receiver chassis. OPERATION PROCEDURE Every control on this receiver serves a specific useful function and is important for the proper operation of your stereo system. We recommend that you read the following section carefully so you may take full advantage of the performance capabilities of your receiver. BALANCE CONTROL The balance control is used to adjust the sound level of each channel with relation to each other. The nature of stereophonic reproduction is such that it requires two identical channels to obtain the optimum stereo effect. As there may be slight differences between the location of the two speakers, tape heads, cartridges, etc., the Balance Control is provided to permit re-balancing of the overall system even in extreme cases where unbalance exists. It should be noted that the Balance Control may be set anywhere within its range of adjustment to attain system balance. VOLUME CONTROL AND POWER SWITCH The Volume Control is used to adjust the volume level of any program material fed into the stereo system. The control varies both channels simultaneously therefore eliminating the necessity of balancing your system each time you change the volume level. In the full counter-clockwise position your receiver is OFF. In order to turn your receiver ON, turn the control clockwise until a click is heard and then adjust the volume level of the program you wish to hear. BASS AND TREBLE CONTROLS The BASS and TREBLE tone controls on your receiver provide the full range of tonal adjustment necessary for stereo high fidelity listening. The tone control range is considerable and can adequately adjust the low and high frequencies in accordance with your listening preference, speaker characteristics and room acoustics. CONTOUR SWITCH One of the limitations of human hearing is its tendency to lose sensitivity to the very low pitched sounds as thF program sound level is reduced. It is this characteristic (known as the Fletcher-Munson effect) which causes one to play music programs at high listening levels in order to experience the full rich tone available from fine modern recordings. The Contour switch compensates for this effect; thereby eliminating high listening levels as a requisite for full enjoyment of reproduced music. STEREO-MONO SWITCH The STEREO-MONO switch is physically located as a "PUSH-PULL" function on the "BALANCE" control. When the switch is in the "IN" position the receiver is operating stereo- phonically. When the switch is pulled to the "OUT" position the receiver is operating monophonically. This position may be used when listening to monophonic records, or when it is desired to reproduce a stereo program, such as an FM stereo broadcast, monophonically. SPEAKER SELECTOR SWITCH Refer to paragraph on speaker connections. MODE SWITCH Program-Source: This is the normal listening position for all program mate- rial; eg: phono, Aux, FM Mono, FM Automatic. Monitor/Playback: a) This is the normal listening position for playing pre- recorded tapes. b) This position is also used to monitor your tapes while in the process of recording. If you are making a recording from Phono, Aux or FM you will hear the program material an instant "after" it has been recorded. Should you wish to listen to the program material "before" it is recorded you must place the mode switch in the "Program/Source position. 7
-
 1
1 -
2
-
 3
3 -
 4
4 -
 5
5 -
 6
6 -
 7
7 -
 8
8 -
 9
9 -
 10
10 -
 11
11 -
 12
12 -
 13
13 -
14
 |
 |
