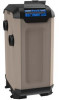
Hayward HYDRAPURE HydraPure Owners Manual - Page 6
Plumbing the HydraPure Unit, Connecting Power to the HydraPure Unit
 |
View all Hayward HYDRAPURE manuals
Add to My Manuals
Save this manual to your list of manuals |
Page 6 highlights
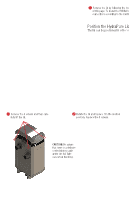
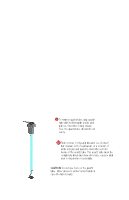
Plumbing the HydraPure Unit 1 Attach the (2) PVC 2½" union nuts to the unit. DO NOT OVER TIGHTEN, OVER TIGHTENING WILL CAUSE THE UNIONS TO BREAK. 2 After cutting pipes to length, debur all cut pipe to ensure shavings don't plug critical points internal to the unit. Use PVC solvent cement to glue pipes into the union sleeve. NOTE the inlet and outlet pipe positions. Connecting Power to the HydraPure Unit Hardwired: 120V or 240V HydraPure unit: Follow steps 1 & 2 below. 2 Remove the lid by following the instruc- tions on the bottom of page 6. Attach wires to connections according to the illustration below. 1 Thread L1, L2 (240V) or N (120V) and ground wire through conduit. L2 if 240V, Ground L1 N if 120V 5 USE ONLY HAYWARD GENUINE REPLACEMENT PARTS
-
 1
1 -
 2
2 -
 3
3 -
 4
4 -
 5
5 -
 6
6 -
 7
7 -
 8
8 -
 9
9 -
 10
10 -
 11
11 -
 12
12 -
13
-
14
-
15
-
16
-
17
-
18
-
19
-
20
 |
 |