Hayward SwimClear™ Models: C2025 C3025 C4025 C5025 C7000 - Page 6
Maintaining Your Filter - swimclear
 |
View all Hayward SwimClear™ manuals
Add to My Manuals
Save this manual to your list of manuals |
Page 6 highlights
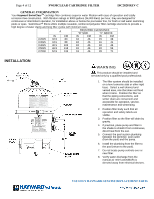
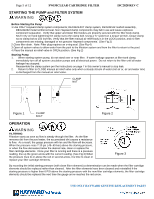
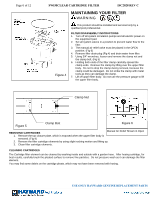
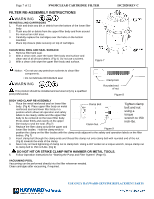
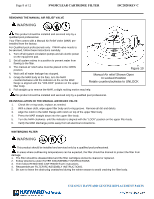
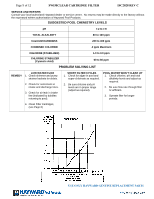
Page 6 of 12 SWIMCLEAR CARTRIDGE FILTER ISC2028 REV C MAINTAINING YOUR FILTER WARNING Figure 4 This product should be installed and serviced only by a qualified pool professional. FILTER DISASSEMBLY INSTRUCTIONS 1. Turn off all system circulation pumps and all electric power on the equipment pad. 2. Set all system valves in a position to prevent water flow to the filter. 3. The manual air relief valve must be placed in the OPEN position. (Fig 6) 4. Remove filter drain plug (Fig 4) and drain water from filter. 5. Using 3/4" wrenches, loosen and remove the clamp nut and the clamp bolt. (Fig 5) 6. Holding both ends of the filter clamp carefully spread the clamp ends. Remove the clamp by lifting over the upper filter body. Do not to drop the clamp during removal, because the clamp could be damaged. Do not strike the clamp with metal tools as they can damage the clamp. 7. Lift off upper filter body. Do not use the pressure gauge to lift the upper filter body. Clamp Nut Figure 5 Clamp Bolt Figure 6 REMOVING CARTRIDGES Manual Air Relief Shown in Open 1. Remove the top closure plate, which is exposed when the upper filter body is removed. (Fig 4) 2. Remove the filter cartridge elements by using slight rocking motion and lifting up. 3. Clean filter cartridge elements. CLEANING CARTRIDGES The Cartridge filter element can be cleaned by washing inside and outside with a garden hose. After hosing cartridge, for best results, carefully brush the pleated surface to remove fine particles. Do not pressure wash as it can damage the filter element. You may find some debris on the cartridge pleats, which may not have been removed with hosing. USE ONLY HAYWARD GENUINE REPLACEMENT PARTS
-
 1
1 -
 2
2 -
 3
3 -
 4
4 -
 5
5 -
 6
6 -
 7
7 -
 8
8 -
 9
9 -
 10
10 -
 11
11 -
 12
12
 |
 |
