Hayward SwimClear™ Models: C2025 C3025 C4025 C5025 C7000 - Page 7
Filter Re-assembly Instructions - swimclear filter parts
 |
View all Hayward SwimClear™ manuals
Add to My Manuals
Save this manual to your list of manuals |
Page 7 highlights
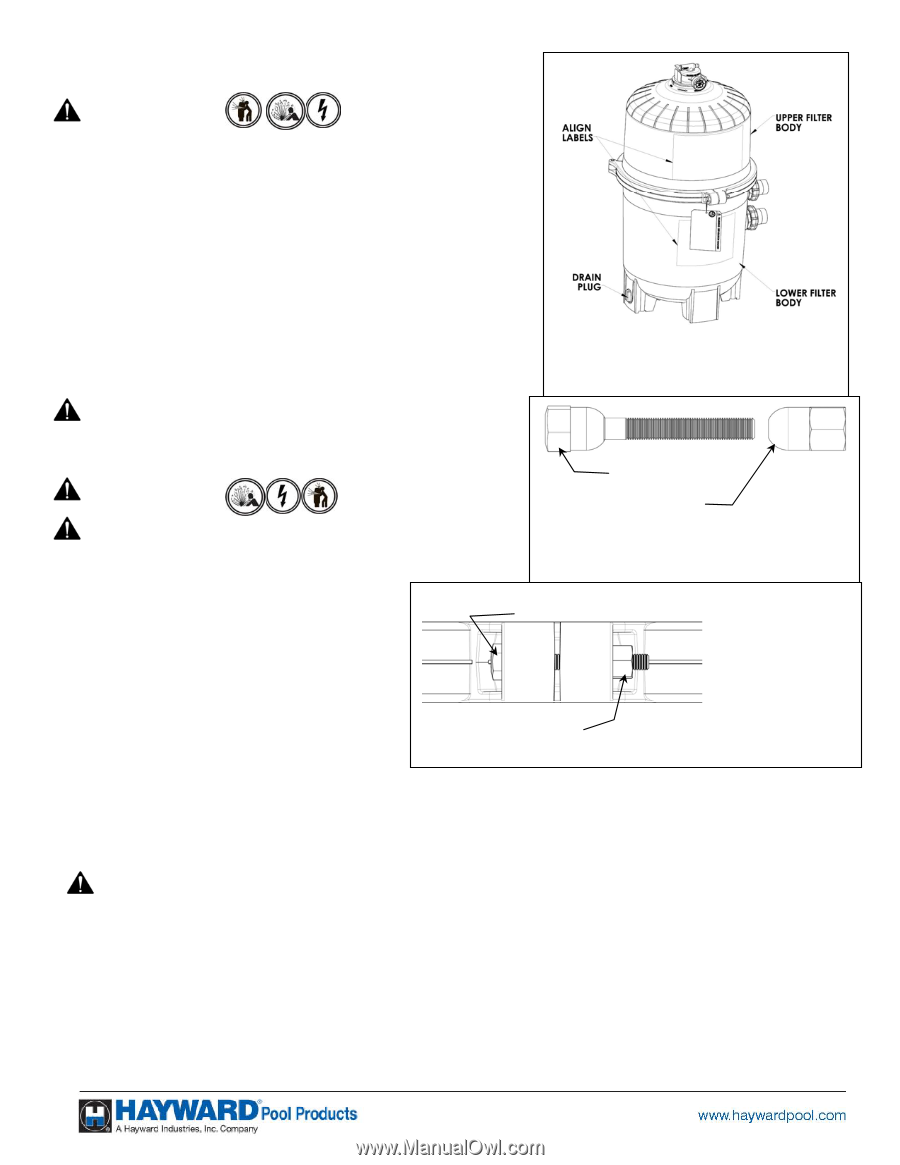
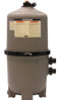
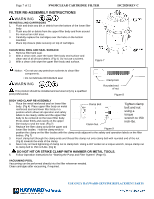
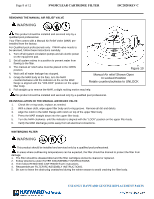
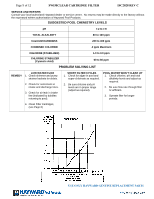
Page 7 of 12 SWIMCLEAR CARTRIDGE FILTER FILTER RE-ASSEMBLY INSTRUCTIONS WARNING RE-INSTALLING CARTRIDGES 1. Flush and drain any dirt or debris from the bottom of the lower filter body. 2. Flush any dirt or debris from the upper filter body and from around the manual air relief area. 3. Carefully replace the cartridges over the hubs on the bottom manifold. 4. Place top closure plate securely on top of cartridges. CLEAN SEAL RING AND SEAL SURFACE 1. Remove filter tank seal. 2. With a clean cloth, wipe the lower filter body seal surface and clean seal of all dirt and debris. (Fig 4) Do not use a solvent. 3. With a clean cloth wipe the upper filter body seal surface. Figure 7 ISC2028 REV C Notice: • Do not use any petroleum solvents to clean filter components. • Do not lubricate DEX2422Z2 seal. WARNING This product should be installed and serviced only by a qualified pool professional. Clamp bolt Rounded end of nut Figure 8 BODY AND CLAMP RE-ASSEMBLY 1. Place the metal reinforced seal on lower filter body. (Fig 4) Place upper filter body on metal reinforced seal and lower filter body in a position which allows all operation and safety labels to be clearly visible and the upper filter Clamp Bolt Tighten clamp bolt and nut using a torque body to be centered on the lower filter body. wrench to 150 Press down firmly and evenly on the upper filter body to seat the seal. (Fig 7) Clamp Nut inch-lbs. 2. Replace the filter clamp around the upper and lower filter bodies. Hold the clamp ends to Figure 9 position the clamp on the filter bodies with the clamp ends adjacent to the safety and operation labels on the filter bodies. (Fig 7) 3. Insert clamp bolt through the clamp ends and thread the clamp nut onto clamp bolt with rounded end of the nut (Fig 8) towards the ends of the clamp. 4. Never rely on hand tightening of clamp nut to clamp bolt. Using a 3/4" socket on a torque wrench, torque clamp nut to clamp bolt to 150 inch-lbs. (Fig 9) DO NOT HIT OR STRIKE CLAMP WITH HAMMER OR METAL TOOLS. 5. Follow Operation Instructions for "Starting the Pump and Filter System" (Page 5). VACUUMING POOL Vacuuming can be performed directly into the filter whenever needed. Clean cartridges after vacuuming, if required. USE ONLY HAYWARD GENUINE REPLACEMENT PARTS
-
 1
1 -
 2
2 -
 3
3 -
 4
4 -
 5
5 -
 6
6 -
 7
7 -
 8
8 -
 9
9 -
 10
10 -
 11
11 -
 12
12
 |
 |