HealthRider R 60 English Manual
HealthRider R 60 Manual
 |
View all HealthRider R 60 manuals
Add to My Manuals
Save this manual to your list of manuals |
HealthRider R 60 manual content summary:
- HealthRider R 60 | English Manual - Page 1
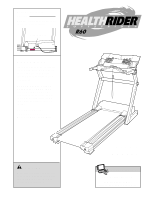
CUSTOMER HOT LINE: 1-800-999-3756 Mon.-Fri., 6 a.m.- 6 p.m. MST CAUTION Read all precautions and instructions in this manual before using this equipment. Save this manual for future reference. USER'S MANUAL Visit our website at www.healthrider.com new products, prizes, fitness tips, and much more! - HealthRider R 60 | English Manual - Page 2
OPERATION 9 HOW TO FOLD AND MOVE THE TREADMILL 24 TROUBLESHOOTING 26 EXERCISE GUIDELINES 28 PART LIST 30 HOW TO ORDER REPLACEMENT PARTS 31 LIMITED WARRANTY Back Cover Note: An EXPLODED DRAWING is attached in the center of this manual. HealthRider is a registered trademark of ICON Health - HealthRider R 60 | English Manual - Page 3
suppressor, see your local HealthRider dealer or call 1-800806-3651 and order part number 146148. 11. Failure to use a properly functioning surge suppressor could result in damage to the control system of the treadmill. If the control system is damaged, the walking belt may change speed or stop - HealthRider R 60 | English Manual - Page 4
procedures de- scribed in this manual. Never remove the motor hood unless instructed to do so by an authorized service representative. Servicing other than the procedures in this manual should be performed by an authorized service representative only. 26. The treadmill is intended for in-home - HealthRider R 60 | English Manual - Page 5
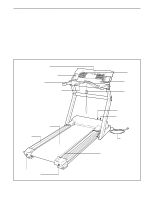
attached to the treadmill (see the front cover of this manual for the location). Before reading further, please familiarize yourself with the parts that are labeled in the drawing below. Book Holder Water Bottle Holder* Handrail Handgrip Pulse Sensor Fans Console Key/Clip Walking Belt Foot Rail - HealthRider R 60 | English Manual - Page 6
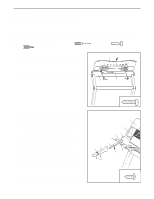
in a cleared area and remove all packing materials. Do not dispose of the packing materials until the treadmill is assembled. Note: The underside of the treadmill walking belt is coated with high-performance lubricant. During shipping, a small amount of lubricant may be transferred to the top - HealthRider R 60 | English Manual - Page 7
72 40 67 5 132 Small Holes 55 132 4. Make sure that all parts are properly tightened before you use the treadmill. Place a mat beneath the treadmill to protect the floor or carpet. For your benefit, we recommend that you familiarize yourself with the TROUBLESHOOTING section on pages 26 and 27. 7 - HealthRider R 60 | English Manual - Page 8
run on the treadmill, position yourself near the center of the walking belt. For the console to display heart rate readings, the user must be within arm's length of the console. • The chest pulse sensor is designed to work with people who have normal heart rhythms. Heart rate reading problems may be - HealthRider R 60 | English Manual - Page 9
treadmill being damaged, always use a surge suppressor with your treadmill (see drawing 1 at the right). To purchase a surge suppressor, see your local HealthRider dealer or call 1-800-806-3651 and order part system of the treadmill. If the control system is damaged, the walking belt may change speed - HealthRider R 60 | English Manual - Page 10
sheet of clear Key Clip plastic on the console, remove it. FEATURES OF THE CONSOLE The treadmill console offers an impressive array of features designed to make your workouts more effective. When the manual mode of the console is selected, the speed and incline of the treadmill can be changed - HealthRider R 60 | English Manual - Page 11
used, observe the alignment of the walking belt, and align the walking belt if necessary (see page 27). 4 Change the incline of the treadmill as desired. To change the incline of the treadmill, press the Incline buttons. Each time a button is pressed, the incline will change by 0.5%. Note: After the - HealthRider R 60 | English Manual - Page 12
time that the walking belt is stopped for a few minutes, the fans will automatically turn off. 8 When you are finished exercising, remove the key from the console. Step onto the foot rails, press the Stop button, and adjust the incline of the treadmill to the lowest setting. The incline must be at - HealthRider R 60 | English Manual - Page 13
of the LED matrix show how the speed and incline of the treadmill will change during the programs. 3 Press the walking belt will then slow to a stop. If the speed or incline setting is too high or too low during the program, you can manually override the setting by pressing the Speed or Incline - HealthRider R 60 | English Manual - Page 14
prob- lems, or if you are over 60 years of age and have been inactive, ended, make sure that the incline of the treadmill is at the lowest setting. Next, remove the key from the console and put 3 Select a heart rate program. When the key is inserted, the manual mode will be selected. To select a heart - HealthRider R 60 | English Manual - Page 15
walking belt will then slow to a stop. If the speed or incline setting is too high or too low during the program, you can adjust the setting with the Speed or Incline and incline of the treadmill may automatically decrease until your pulse is detected. If this occurs, refer to the instructions on - HealthRider R 60 | English Manual - Page 16
key is inserted, the manual mode incline settings. A moment after the button is pressed, the walking belt will begin to move. Hold the handrails and begin walking incline setting for the first segment, simply adjust the speed and incline of the treadmill as desired by pressing the Speed and Incline - HealthRider R 60 | English Manual - Page 17
column and the treadmill will automatically adjust to the second speed and incline settings that you programmed previously. The program will continue in this way until the speed setting for the last segment is shown in the Current Segment column and the last segment ends. The walking belt will then - HealthRider R 60 | English Manual - Page 18
: If your CD player has separate LINE OUT and PHONES jacks, see instruction A below. If your CD player has only one jack, see instruction B. A. Plug one end of the audio cable into the jack on the front of the treadmill near the power cord. Plug the other end of the cable into the - HealthRider R 60 | English Manual - Page 19
B. Note: If your computer has a 3.5mm LINE OUT jack, see instruction A. If your computer has only a PHONES jack, see instruction B. A. Plug one end of the audio cable into the jack on the front of the treadmill near the power cord. Plug the other end of the cable into the included adapter - HealthRider R 60 | English Manual - Page 20
Select the iFIT.com mode. When the key is inserted, the manual mode will be selected. To use iFIT personal trainer will begin guiding you through your workout. Simply follow your personal trainer's instructions. Note: If the and/or incline of the treadmill is about to change. CAUTION: Always listen for - HealthRider R 60 | English Manual - Page 21
program is completed, the walking belt will stop and the Time/Segment Time/Pace display will begin to flash. Note: To use another CD or video program, press the Stop button or remove the key and go to step 1 on page 20. Note: If the speed or incline of the treadmill does not change when - HealthRider R 60 | English Manual - Page 22
connection and an internet service provider. A list the key is inserted, the manual mode walking belt will begin to move. Hold the handrails, step onto the walking belt, and begin walking. During the program, an electronic "chirping" sound will alert you when the speed and/or incline of the treadmill - HealthRider R 60 | English Manual - Page 23
of hours the treadmill has been used. The Distance/Incline/Laps display will show the total number of miles (or kilometers) that the walking belt has moved. only when a treadmill is displayed in a store. When the console is in the demo mode, the power cord can be plugged in, the key can be removed - HealthRider R 60 | English Manual - Page 24
HOW TO FOLD AND MOVE THE TREADMILL HOW TO FOLD THE TREADMILL FOR STORAGE Before folding the treadmill, adjust the incline to the lowest position. If this is not done, the treadmill may be permanently damaged. Next, unplug the power cord. CAUTION: You must be able to safely lift 45 pounds (20 kg) to - HealthRider R 60 | English Manual - Page 25
your left hand. Pull the lock knob to the right. Pivot the treadmill down until the pin on the lock knob is below the foam grip. Slowly release the lock knob. 2. Hold the treadmill firmly with both hands, and lower the treadmill to the floor. To decrease the possibility of injury, bend your - HealthRider R 60 | English Manual - Page 26
TROUBLESHOOTING Most treadmill problems can be solved by following the instructions below. If further assistance is needed, please call our Customer Service Department toll-free at 1-800-999-3756, Monday through Friday, 6 a.m. until 6 p.m. Mountain Time (excluding holidays). PROBLEM SOLUTION 1. - HealthRider R 60 | English Manual - Page 27
of a turn. Be careful not to overtighten the walking belt. Plug in the power cord, insert the key and run the treadmill for a few minutes. Repeat until the walking belt is centered. b. If the walking belt slips when walked on, b first remove the key and UNPLUG THE POWER CORD. Using the allen - HealthRider R 60 | English Manual - Page 28
to oxygenate the blood. For aerobic exercise, adjust the speed or incline of the treadmill until your heart rate is near the highest number in your training zone. WORKOUT GUIDELINES Each workout should include the following three parts: A Warm-up-Start each workout with 5 to 10 minutes of stretching - HealthRider R 60 | English Manual - Page 29
SUGGESTED STRETCHES The correct form for several basic stretches is shown at the right. Move slowly as you stretch-never bounce. 1. Toe Touch Stretch Stand with your knees bent slightly and slowly bend forward from 1 your hips. Allow your back and shoulders to relax as you reach down toward - HealthRider R 60 | English Manual - Page 30
PART LIST-Model No. HRTL07120 R0902C To locate the parts listed below, refer to the EXPLODED DRAWING attached in the center of this manual. Key No. Qty. Description Key No. Qty. Description 1 2 2 4 3 1 4 4 5 1 6 1 7 4 8 1 9 2 10 4 11 1 12 1 13 7 14 2 15 2 16 1 17 1 18 - HealthRider R 60 | English Manual - Page 31
Bushing Idler Arm Nylon Washer Key No. Qty. Description 123 1 124 1 125 1 126 4 127 1 128 1 129 1 130 2 131 8 132 2 # 1 # 1 # 1 # 1 # 1 # 1 # 1 # 1 # 1 Hand Pulse Wire Incline Bracket Incline Motor Bolt (Bottom) Controller Screw Motor Isolator Plate Left Cup Holder - HealthRider R 60 | English Manual - Page 32
to give the following information: • The MODEL NUMBER of the product (HRTL07120) • The NAME of the product (HealthRider® R60 treadmill) • The SERIAL NUMBER of the product (see the front cover of this manual) • The KEY NUMBER and DESCRIPTION of the part(s) (see the PART LIST on pages 30 and 31 - HealthRider R 60 | English Manual - Page 33
EXPLODED DRAWING-Model No. HRTL07120 To identify the parts shown on this EXPLODED DRAWING, refer to the PART LIST on pages 30 and 31. 21 1 21 90 57 19 21 32 29 13 31 112 33 127 46 44 25 34 44 103 44 101 100 43 44 27 60 126 21 19 13 27 14 43 38 15 10 7 10 40 9 35 44 36 3 37 - HealthRider R 60 | English Manual - Page 34
93 82 119 40 75 113 117 14 49 40 92 107 106 88 114 129 105 51 94 96 95 97 R1202A EXPLODED DRAWING-Model No. HRTL07120
-
 1
1 -
 2
2 -
 3
3 -
 4
4 -
 5
5 -
 6
6 -
 7
7 -
8
-
9
-
10
-
11
-
12
-
13
-
14
-
15
-
16
-
17
-
18
-
19
-
20
-
21
-
22
-
23
-
24
-
25
-
26
-
27
-
28
-
29
-
30
-
31
-
32
-
33
-
34
 |
 |

Model No. HRTL07120
Serial No.
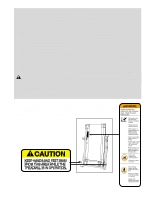
CAUTION
Read all precautions and instruc-
tions in this manual before using
this equipment. Save this man-
ual for future reference.
Write the serial number in the space
above for future reference.
Serial Number
Decal
QUESTIONS?
If you have questions, or if there
are missing parts, we will guar-
antee complete satisfaction
through direct assistance from
our factory.
TO AVOID DELAYS, PLEASE
CALL DIRECT TO OUR TOLL-
FREE CUSTOMER HOT LINE.
The trained technicians on our
customer hot line will provide
immediate assistance, free of
charge.
CUSTOMER HOT LINE:
1-800-999-3756
Mon.–Fri., 6 a.m.– 6 p.m. MST
Visit our website at
www.healthrider.com
new products, prizes,
fitness tips, and much more!
USER'S
MANUAL