HP 1120c HP DeskJet 1120C Professional Series - (English) User's Guide - Page 22
Paper is Jammed in the Printer, Insufficient harddisk space or virtual, memory to print, Printing - blinking light
 |
View all HP 1120c manuals
Add to My Manuals
Save this manual to your list of manuals |
Page 22 highlights
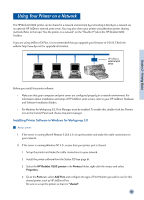
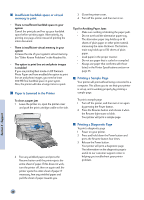
Insufficient harddisk space or virtual memory to print 3 Close the printer cover. 4 Turn off the printer, and then turn it on. • There is insufficient harddisk space in your system Cancel the print job and free up your harddisk space before printing again. Alternatively, try printing one page a time instead of printing the entire document. • There is insufficient virtual memory in your system Increase the size of your system's virtual memory. See "Other Known Problems" in the Readme file. • The option to print line art and photo images is enabled If you are printing Best mode on HP Premium Photo Paper and have enabled the option to print line art and photo images, you need at least 200 MB free harddisk space in your sytem. Also, the printer will take a longer time to spool. Paper is Jammed in the Printer To clear a paper jam 1 Leave the printer on, open the printer cover and push the print cartridge cradle to the side. Tips for Avoiding Paper Jams • Make sure nothing is blocking the paper path. • Do not overload the alternative paper tray. The alternative paper tray holds up to 10 sheets of plain paper or other print material measuring the same thickness. The bottom main tray holds up to 150 sheets of plain paper. • Load paper in the proper manner. • Do not use paper that is curled or crumpled. • Always use paper that conforms with those listed, in the Printer Specifications section on page 25. • Printing a Sample Page Your printer will print without being connected to a computer. This allows you to see that your printer is set up, and is working properly by printing a sample page. To print a sample page 1 Turn off the printer, and then turn it on again by pressing the Power button. 2 Press the Resume button and release it when the Resume light starts to blink. Your printer will print a sample page. 2 Free any wrinkled paper and press the Resume button until the printer ejects the entire sheet of paper. If this does not work, turn the printer off, then on again until the printer ejects the entire sheet of paper. If necessary, free any wrinkled paper and pull the sheet of paper towards you. Printing a Diagnostic Page To print a diagnostic page 1 Power on your printer. 2 Press and hold down the Power button and press the Resume button four times. 3 Release the Power button. Your printer will print a diagnostic page. The information on the diagnostic page is useful to our customer support center in helping you troubleshoot your printer problem. Section 3 - Support 20
-
 1
1 -
2
-
3
-
4
-
5
-
6
-
7
-
8
-
9
-
10
-
11
-
12
-
13
-
14
-
15
-
16
-
 17
17 -
 18
18 -
 19
19 -
 20
20 -
 21
21 -
 22
22 -
 23
23 -
 24
24 -
 25
25 -
 26
26 -
 27
27 -
28
-
29
-
30
-
31
 |
 |