HP 2300 Service Manual - Page 173
Use a flatblade screwdriver to pry the small rollers out of the holders.
 |
UPC - 808736470698
View all HP 2300 manuals
Add to My Manuals
Save this manual to your list of manuals |
Page 173 highlights
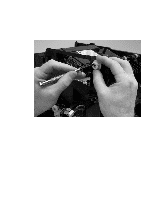
Note 6 To remove the small rollers, rotate the roller holders toward the back of the printer until the hinges are clear of obstruction, and then lift the holders off of the printer. Each roller holder should have a spring attached. Make sure that the springs are in place before reinstalling a roller holder. 7 Use a flatblade screwdriver to pry the small rollers out of the holders. Figure 96. Removing the top-output-bin delivery assembly (3 of 3) Reinstall note Two types of small roller holders are installed on the printer, and they are not interchangeable. Make sure you replace the roller holders in their correct positions on the printer. ENWW Chapter 6 Removal and replacement 171
-
 1
1 -
2
-
3
-
4
-
5
-
6
-
7
-
8
-
9
-
10
-
11
-
12
-
13
-
14
-
15
-
16
-
17
-
18
-
19
-
20
-
21
-
22
-
23
-
24
-
25
-
26
-
27
-
28
-
29
-
30
-
31
-
32
-
33
-
34
-
35
-
36
-
37
-
38
-
39
-
40
-
41
-
42
-
43
-
44
-
45
-
46
-
47
-
48
-
49
-
50
-
51
-
52
-
53
-
54
-
55
-
56
-
57
-
58
-
59
-
60
-
61
-
62
-
63
-
64
-
65
-
66
-
67
-
68
-
69
-
70
-
71
-
72
-
73
-
74
-
75
-
76
-
77
-
78
-
79
-
80
-
81
-
82
-
83
-
84
-
85
-
86
-
87
-
88
-
89
-
90
-
91
-
92
-
93
-
94
-
95
-
96
-
97
-
98
-
99
-
100
-
101
-
102
-
103
-
104
-
105
-
106
-
107
-
108
-
109
-
110
-
111
-
112
-
113
-
114
-
115
-
116
-
117
-
118
-
119
-
120
-
121
-
122
-
123
-
124
-
125
-
126
-
127
-
128
-
129
-
130
-
131
-
132
-
133
-
134
-
135
-
136
-
137
-
138
-
139
-
140
-
141
-
142
-
143
-
144
-
145
-
146
-
147
-
148
-
149
-
150
-
151
-
152
-
153
-
154
-
155
-
156
-
157
-
158
-
159
-
160
-
161
-
162
-
163
-
164
-
165
-
166
-
167
-
 168
168 -
 169
169 -
 170
170 -
 171
171 -
 172
172 -
 173
173 -
 174
174 -
 175
175 -
 176
176 -
 177
177 -
 178
178 -
179
-
180
-
181
-
182
-
183
-
184
-
185
-
186
-
187
-
188
-
189
-
190
-
191
-
192
-
193
-
194
-
195
-
196
-
197
-
198
-
199
-
200
-
201
-
202
-
203
-
204
-
205
-
206
-
207
-
208
-
209
-
210
-
211
-
212
-
213
-
214
-
215
-
216
-
217
-
218
-
219
-
220
-
221
-
222
-
223
-
224
-
225
-
226
-
227
-
228
-
229
-
230
-
231
-
232
-
233
-
234
-
235
-
236
-
237
-
238
-
239
-
240
-
241
-
242
-
243
-
244
-
245
-
246
-
247
-
248
-
249
-
250
-
251
-
252
-
253
-
254
-
255
-
256
-
257
-
258
-
259
-
260
-
261
-
262
-
263
-
264
-
265
-
266
-
267
-
268
-
269
-
270
-
271
-
272
-
273
-
274
-
275
-
276
-
277
-
278
-
279
-
280
-
281
-
282
-
283
-
284
-
285
-
286
-
287
-
288
-
289
-
290
-
291
-
292
-
293
-
294
-
295
-
296
 |
 |

ENWW
Chapter 6 Removal and replacement
171
6
To remove the small rollers, rotate the roller holders toward the back of the printer until the
hinges are clear of obstruction, and then lift the holders off of the printer.
Note
Each roller holder should have a spring attached. Make sure that the springs are in place before
reinstalling a roller holder.
7
Use a flatblade screwdriver to pry the small rollers out of the holders.
Figure 96.
Removing the top-output-bin delivery assembly (3 of 3)
Reinstall note
Two types of small roller holders are installed on the printer, and they are
not
interchangeable.
Make sure you replace the roller holders in their correct positions on the printer.