HP 450c Service Manual - Page 79
PrintĆQuality Plot, Introduction, Using the PrintĆQuality Plot, Media Type, Print, Quality, Ready
 |
View all HP 450c manuals
Add to My Manuals
Save this manual to your list of manuals |
Page 79 highlights
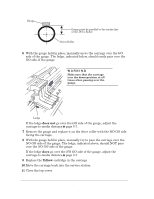
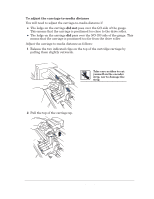
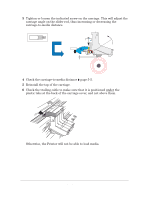
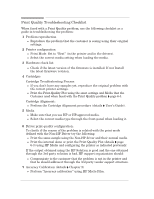
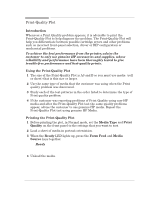
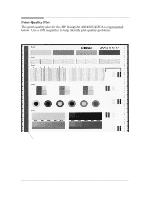
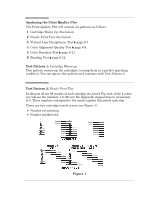
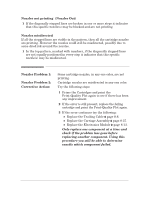
PrintĆQuality Plot Introduction Whenever a Print Quality problem appears, it is advisable to print the PrintĆQuality Plot to help diagnose the problem. The PrintĆQuality Plot will help you differentiate between possible cartridge errors and other problems such as incorrect frontĆpanel selection, driver or RIP configuration or mechanical problems. To achieve the best performance from the printer, advise the customer to only use genuine HP accessories and supplies, whose reliability and performance have been thoroughly tested to give troubleĆfree performance and bestĆquality prints. Using the PrintĆQuality Plot 1 The size of the PrintĆQuality Plot is A3 and B so you must use media (roll or sheet) that is this size or larger. 2 Use the same type of media that the customer was using when the Print quality problem was discovered. 3 Study each of the test patterns in the order listed to determine the type of Print quality problem. 4 If the customer was reporting problems of Print Quality using nonĆHP media and after the PrintĆQuality Plot test the same quality problems appear, advise the customer to use genuine HP media. Repeat the PrintĆQuality Plot test using genuine HP Media. Printing the PrintĆQuality Plot 1 Before printing the plot, in Normal mode, set the Media Type and Print Quality on the front panel to the settings that you want to test. 2 Load a sheet of media in portrait orientation. 3 When the Ready LED lights up, press the Form Feed and Media Source keys together. The Ready light begins to flash, and the media moves slightly forward. The carriage moves to the right side of the Printer, and the fan turns on. The Printer plots the print-quality plot and ejects the media. 4 Unload the media. Print Quality HP DesignJet 430, 450C and 455CA Printers 6-3
-
 1
1 -
2
-
3
-
4
-
5
-
6
-
7
-
8
-
9
-
10
-
11
-
12
-
13
-
14
-
15
-
16
-
17
-
18
-
19
-
20
-
21
-
22
-
23
-
24
-
25
-
26
-
27
-
28
-
29
-
30
-
31
-
32
-
33
-
34
-
35
-
36
-
37
-
38
-
39
-
40
-
41
-
42
-
43
-
44
-
45
-
46
-
47
-
48
-
49
-
50
-
51
-
52
-
53
-
54
-
55
-
56
-
57
-
58
-
59
-
60
-
61
-
62
-
63
-
64
-
65
-
66
-
67
-
68
-
69
-
70
-
71
-
72
-
73
-
 74
74 -
 75
75 -
 76
76 -
 77
77 -
 78
78 -
 79
79 -
 80
80 -
 81
81 -
 82
82 -
 83
83 -
 84
84 -
85
-
86
-
87
-
88
-
89
-
90
-
91
-
92
-
93
-
94
-
95
-
96
-
97
-
98
-
99
-
100
-
101
-
102
-
103
-
104
-
105
-
106
-
107
-
108
-
109
-
110
-
111
-
112
-
113
-
114
-
115
-
116
-
117
-
118
-
119
-
120
-
121
-
122
-
123
-
124
-
125
-
126
-
127
-
128
-
129
-
130
-
131
-
132
-
133
-
134
-
135
-
136
-
137
-
138
-
139
-
140
-
141
-
142
-
143
-
144
-
145
-
146
-
147
-
148
-
149
-
150
-
151
-
152
-
153
-
154
-
155
-
156
-
157
-
158
-
159
-
160
-
161
-
162
-
163
-
164
-
165
-
166
-
167
-
168
-
169
-
170
-
171
-
172
-
173
-
174
-
175
-
176
-
177
-
178
-
179
-
180
-
181
-
182
-
183
-
184
-
185
-
186
-
187
-
188
-
189
-
190
-
191
-
192
-
193
-
194
-
195
-
196
-
197
-
198
-
199
-
200
-
201
-
202
-
203
-
204
-
205
-
206
-
207
-
208
 |
 |
