HP 60 HP StorageWorks 60 Modular Smart Array Enclosure Maintenance and Service - Page 26
Power on/off board
 |
View all HP 60 manuals
Add to My Manuals
Save this manual to your list of manuals |
Page 26 highlights
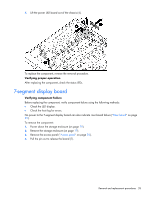
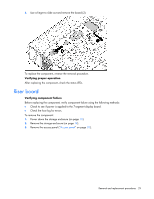
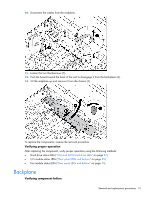
4. Remove the plastic housing from the board (3). To replace the components, reverse the removal procedure. NOTE: For proper LED operation, when installing the new front UID board be sure that the component is properly lined up. Verifying proper operation After replacing the component, check the status LED. Power on/off board Verifying component failure Before replacing the component, verify component failure using the following methods: • Check the heartbeat LED and fault LED status ("Front panel LEDs and buttons" on page 34). • Check the power supply LED status ("Rear panel LEDs and buttons" on page 35). • Check the host log for errors. To remove the components: 1. Power down the storage enclosure (on page 19). 2. Remove the storage enclosure (on page 19). 3. Remove the access panel ("Access panel" on page 20). 4. Remove the front UID board ("Front UID board" on page 25). 5. Remove power supply 1 ("Hot-plug power supply" on page 22). 6. Squeeze the clips on top and bottom of the plastic cover (1), and then remove it by pulling out through the chassis opening (2). 7. Disconnect the cable (3). 8. Loosen the thumbscrew on the power on/off board (4). Removal and replacement procedures 26
-
 1
1 -
2
-
3
-
4
-
5
-
6
-
7
-
8
-
9
-
10
-
11
-
12
-
13
-
14
-
15
-
16
-
17
-
18
-
19
-
20
-
 21
21 -
 22
22 -
 23
23 -
 24
24 -
 25
25 -
 26
26 -
 27
27 -
 28
28 -
 29
29 -
 30
30 -
 31
31 -
32
-
33
-
34
-
35
-
36
-
37
-
38
-
39
-
40
-
41
-
42
 |
 |
