HP 7660 HP Photosmart 7600 series - (English) Basics Guide - Page 21
set the date and time stamp, print borderless photos - support
 |
UPC - 844844844303
View all HP 7660 manuals
Add to My Manuals
Save this manual to your list of manuals |
Page 21 highlights
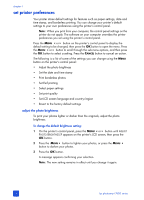
get started set the date and time stamp You can print the date and time that you took the photo in the lower-left corner of your photos. The default setting is Off. Note: If you modify a photo using your computer, the original date and time information is lost. Changes that you make to the photo using the printer's control panel (such as changing the brightness or size) do not affect the date and time information. To change the default date/time setting: 1 On the printer's control panel, press the MENU or button until DATE/ TIME STAMP OPTION? appears on the printer's LCD screen, and then press the OK button. Note: An asterisk (*) next to a setting indicates the current selection. 2 Select one of the following: - Date/time - To turn both the date and time stamp on, press the MENU or button until DATE/TIME appears, then press the OK button. - Date only - To turn only the date stamp on, press the MENU or button until DATE ONLY appears, then press the OK button. - Off - To turn the date and time stamp off, press the MENU or button until OFF appears, then press the OK button. A message appears confirming your selection. Note: The new setting remains in effect until you change it again. print borderless photos By default, your printer prints photos without borders so that photos print to the edges of the photo paper. If you turn this feature off, all photos print with borders. Borderless printing is supported for 4 x 6 inch photo paper (100 x 150 mm), 8.5 x 11 inch (216 x 280 mm) paper. On 4 x 6 inch photo paper with 0.5 inch tab (10 x 15 cm with 1.25 cm tab), the photo prints without borders on three sides and with a small border on the bottom edge. Photos printed on other paper sizes print with borders even if you turn borderless printing on. This is caused by the way the printer handles the paper and is not an error. Note: Borderless printing is not the default setting when you print photos from your computer. The software application you are using to print photos determines the setting. Note: HP does not recommend printing borderless photos on plain paper. For more information about recommended paper types, see recommended paper on page 51. basics guide 17
-
 1
1 -
2
-
3
-
4
-
5
-
6
-
7
-
8
-
9
-
10
-
11
-
12
-
13
-
14
-
15
-
 16
16 -
 17
17 -
 18
18 -
 19
19 -
 20
20 -
 21
21 -
 22
22 -
 23
23 -
 24
24 -
 25
25 -
 26
26 -
27
-
28
-
29
-
30
-
31
-
32
-
33
-
34
-
35
-
36
-
37
-
38
-
39
-
40
-
41
-
42
-
43
-
44
-
45
-
46
-
47
-
48
-
49
-
50
-
51
-
52
-
53
-
54
-
55
-
56
-
57
-
58
-
59
-
60
-
61
-
62
-
63
-
64
 |
 |