HP Cc3310 Processor Installation and Replacement Procedure For the HP cc3310 C - Page 5
Replacing/Transferring a Processor
 |
View all HP Cc3310 manuals
Add to My Manuals
Save this manual to your list of manuals |
Page 5 highlights
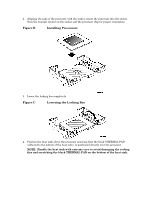
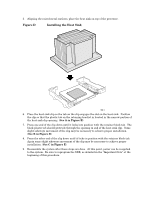
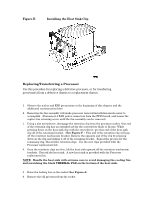
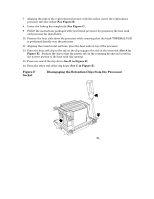
Figure E Installing the Heat Sink Clip Replacing/Transferring a Processor Use this procedure for replacing a defective processor, or for transferring processor(s) from a defective chassis to a replacement chassis. 1. Observe the safety and ESD precautions at the beginning of this chapter and the additional cautions given here. 2. Removing the fan assembly will make processor removal/installation much easier to accomplish. (Disconnect 4 FAN power connectors from the FPIO board, and loosen the captive fan retaining screw until the fan assembly can be removed.) 3. Using a slot screwdriver, disengage the retention clip from the processor socket. One end of the retention clip has an extended tab for the screwdriver blade to fit into. While pressing down on the heat sink clip with the screwdriver, pry this end of the heat sink clip off of the retaining bracket. (See Figure F ) This end of the retention clip will pop off the retention mechanism bracket. Remove the opposite end of the clip by pressing down on the clip and sliding it off of the retaining bracket. Repeat the process for the remaining clip. Discard the retention clips. Use the new clips provided with the Processor replacement kit.. 4. Once the retention clips are free, lift the heat sink upward off the retention mechanism brackets. Discard the heat sink. A new heat sink is provided with the Processor replacement kit. NOTE: Handle the heat sink with extreme care to avoid damaging the cooling fins and scratching the black THERMAL PAD on the bottom of the heat sink. 5. Raise the locking bar on the socket (See Figure A). 6. Remove the old processor from the socket.
-
 1
1 -
 2
2 -
 3
3 -
 4
4 -
 5
5 -
 6
6
 |
 |
