HP Cc3310 Processor Installation and Replacement Procedure For the HP cc3310 C - Page 6
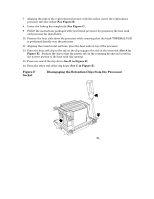
F, Disengaging the Retention Clips from the Processor, Socket
 |
View all HP Cc3310 manuals
Add to My Manuals
Save this manual to your list of manuals |
Page 6 highlights
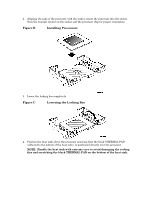
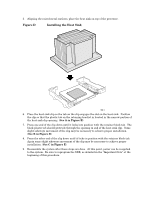
7. Aligning the pins of the replacement processor with the socket, insert the replacement processor into the socket (See Figure B). 8. Lower the locking bar completely (See Figure C). 9. Follow the instructions packaged with your boxed processor for preparing the heat sink and processor for installation. 10. Position the heat sink above the processor while ensuring that the black THERMAL PAD is positioned directly over the processor. 11. Aligning the raised metal surfaces, place the heat sink on top of the processor. 12. Place the heat sink clip so the tab on the clip engages the slot on the heat sink (See A in Figure E). Position the clip so that the plastic tab on the retaining bracket in located in the narrow portion of the heat sink clip opening. 13. Press one end of the clip down (See B in Figure E). 14. Press the other end of the clip down (See C in Figure E). Figure F Socket Disengaging the Retention Clips from the Processor
-
 1
1 -
 2
2 -
 3
3 -
 4
4 -
 5
5 -
 6
6
 |
 |
