HP Cluster Platform Hardware Kits v2010 Integrity rx2600 Cable Management Tray - Page 9
Removing the Server for Servicing
 |
View all HP Cluster Platform Hardware Kits v2010 manuals
Add to My Manuals
Save this manual to your list of manuals |
Page 9 highlights
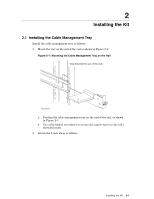
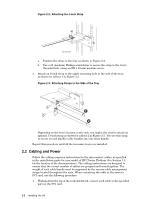
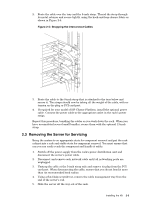
2. Route the cable over the tray and the 5-inch strap. Thread the strap through its metal retainer and secure tightly, using the hook-and-loop closure fabric as shown in Figure 2-4. Figure 2-4: Strapping the Interconnect Cables 3. Route the cable to the 8-inch strap that is attached to the tray below and secure it. The straps should now be taking all the weight of the cable, with no tension on the plug or PCI card port. 4. If required for your model of HP Cluster Platform, install the optional power cable. Connect the power cable to the appropriate outlet in the rack's power strips. Repeat this procedure, bundling the cables as you work down the rack. When you have accumulated several small bundles, secure them with the optional 13-inch strap. 2.3 Removing the Server for Servicing Bring the system to an appropriate state for component removal and put the rack cabinet into a safe and stable state for component removal. You must ensure that can you can easily reach the component and handle it safely. 1. Switch off the power supply from the rack's power distribution unit and disconnect the server's power cable. 2. Disconnect and remove each network cable until all networking ports are unplugged. 3. Unstrap the cable at the 5-inch strap only and remove its plug from the PCI card port. When disconnecting the cable, ensure that you do not bend it more than its recommended bend radius. 4. Using a flat-blade screwdriver, remove the cable management tray from the end of the server's rail. 5. Slide the server all the way out of the rack. Installing the Kit 2-3
-
 1
1 -
2
-
3
-
 4
4 -
 5
5 -
 6
6 -
 7
7 -
 8
8 -
 9
9
 |
 |
