HP Color Copier 210Lx HP Color Copier Model 210/210LX - (English) User Guide - Page 16
Color Copier 210., When all four print cartridges are securely in place, close the lid of your HP
 |
View all HP Color Copier 210Lx manuals
Add to My Manuals
Save this manual to your list of manuals |
Page 16 highlights
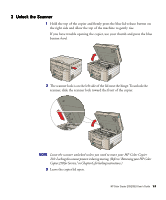
4 Push the print cartridge firmly down into the correct carriage stall. The color of the label must match the color of the dot above the stall. The following illustration shows the yellow cartridge being installed: 5 Snap the print cartridge toward the back of the copier (until the cartridge can go no further). 6 When all four print cartridges are securely in place, close the lid of your HP Color Copier 210. HP Color Copier 210/210LX User's Guide 1-9
-
 1
1 -
2
-
3
-
4
-
5
-
6
-
7
-
8
-
9
-
10
-
 11
11 -
 12
12 -
 13
13 -
 14
14 -
 15
15 -
 16
16 -
 17
17 -
 18
18 -
 19
19 -
 20
20 -
 21
21 -
22
-
23
-
24
-
25
-
26
-
27
-
28
-
29
-
30
-
31
-
32
-
33
-
34
-
35
-
36
-
37
-
38
-
39
-
40
-
41
-
42
-
43
-
44
-
45
-
46
-
47
-
48
-
49
-
50
-
51
-
52
-
53
-
54
-
55
-
56
-
57
-
58
-
59
-
60
-
61
-
62
-
63
-
64
-
65
-
66
-
67
-
68
-
69
-
70
-
71
-
72
-
73
-
74
-
75
-
76
-
77
-
78
-
79
-
80
-
81
-
82
-
83
-
84
-
85
-
86
-
87
-
88
-
89
-
90
-
91
-
92
-
93
-
94
-
95
-
96
 |
 |

HP Color Copier 210/210LX User’s Guide
1-9
1-9
1-9
1-9
1-9
4
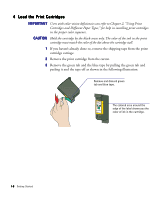
Push the print cartridge firmly down into the correct carriage stall. The color
of the label must match the color of the dot above the stall. The following
illustration shows the yellow cartridge being installed:
5
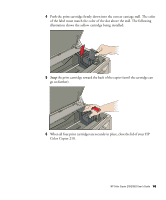
Snap
the print cartridge toward the back of the copier (until the cartridge can
go no further).
6
When all four print cartridges are securely in place, close the lid of your HP
Color Copier 210.