HP Color LaserJet 9500 HP Color LaserJet 9500n and 9500hdn - Software Technica - Page 105
Deleting a print job, Output bin options, Options, Document preview image - multifunction series
 |
View all HP Color LaserJet 9500 manuals
Add to My Manuals
Save this manual to your list of manuals |
Page 105 highlights
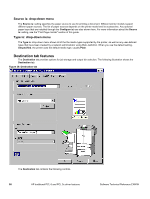
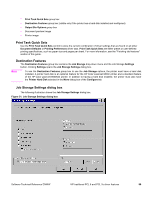
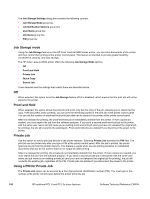
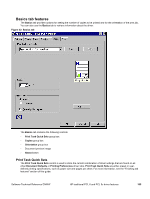
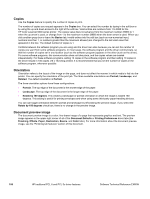
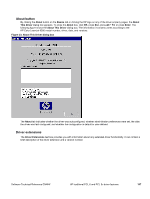
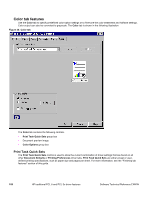
5. Press the up and down buttons to scroll to PRINT. The PRINT selection has an icon next to it indicating that the job is locked and requires a PIN to print. Press the select button. 6. Type in the PIN using the control panel number pad, and then press the select button. 7. Indicate the number of copies you wish to print, and then press the select button. The default is one copy. 8. The private job prints and then is deleted from the hard disk. Deleting a print job Note Sometimes it is necessary to delete a print job from the printer hard disk. You can do this by using the printer control panel. 1. Press the select button (the one with the check mark) to open the menus. 2. Press the up and down buttons to scroll to RETRIEVE JOB. 3. Press the up and down buttons to scroll to the user name, and then press the select button. 4. Press the up and down buttons to scroll to the job name, and then press the select button. 5. Press the up and down buttons to scroll to DELETE, and then press the select button. The DELETE selection might have an icon next to it indicating that the job is locked. If so, type the PIN number, and then press the select button. 6. The stored print job is deleted and the printer returns to the Ready state. Output bin options The Output Bin Options group box contains a drop-down menu that you can use to select an output bin from a list of configured output bins. Only output bins that are configured on the Configure tab appear in this drop-down menu. The HP Color LaserJet 9500 series printer comes with two output bins. Print jobs use the top output bin when the rear output bin is closed. When the rear output bin is open, print jobs use this bin and emerge face-up from the printer. The output bin options that can be selected in the driver are: • The Top Bin (Face-Down) option refers to the main output bin at the top of the printer. The print jobs sent to this bin are delivered face-down. This option is always available and has no media size or type constraints beyond those determined by the printer hardware. Note When using the face-down output bin, you must manually switch the bin between face-down and face-up output. • The Left Bin (Face-Up) option refers to the bin on the left side of the printer. The print jobs sent to this bin are delivered face-up. The HP Color LaserJet 9500hdn printer comes standard with one of the following output devices. • HP 3000-Sheet Stapler/Stacker. This single 3000-sheet stacking device accommodates up to 3,000 sheets of Letter-sized and A4-sized paper, or up to 1,500 sheets of 11-inch by 17-inch and A3 paper. It provides multi-position stapling for up to 50 sheets of paper per document. • HP 3000-Sheet Stacker. This single, 3000-sheet stacking device accommodates up to 3,000 sheets of Letter- sized and A4-sized paper, or up to 1,500 sheets of 11-inch by 17-inch and A3 paper. • HP Multifunction Finisher. This booklet-printing device creates booklets and stapled documents in a variety of sizes. Options The Options drop-down menu is inactive. You can use this setting to enable non-HP paper-handling devices. Document preview image The document preview image is a color, line-drawn image of a page that represents graphics and text. The preview image appears in the upper-right corner of all of the Document Defaults or Printing Preferences driver tabs (the Software Technical Reference ENWW HP traditional PCL 6 and PCL 5c driver features 103
-
 1
1 -
2
-
3
-
4
-
5
-
6
-
7
-
8
-
9
-
10
-
11
-
12
-
13
-
14
-
15
-
16
-
17
-
18
-
19
-
20
-
21
-
22
-
23
-
24
-
25
-
26
-
27
-
28
-
29
-
30
-
31
-
32
-
33
-
34
-
35
-
36
-
37
-
38
-
39
-
40
-
41
-
42
-
43
-
44
-
45
-
46
-
47
-
48
-
49
-
50
-
51
-
52
-
53
-
54
-
55
-
56
-
57
-
58
-
59
-
60
-
61
-
62
-
63
-
64
-
65
-
66
-
67
-
68
-
69
-
70
-
71
-
72
-
73
-
74
-
75
-
76
-
77
-
78
-
79
-
80
-
81
-
82
-
83
-
84
-
85
-
86
-
87
-
88
-
89
-
90
-
91
-
92
-
93
-
94
-
95
-
96
-
97
-
98
-
99
-
 100
100 -
 101
101 -
 102
102 -
 103
103 -
 104
104 -
 105
105 -
 106
106 -
 107
107 -
 108
108 -
 109
109 -
 110
110 -
111
-
112
-
113
-
114
-
115
-
116
-
117
-
118
-
119
-
120
-
121
-
122
-
123
-
124
-
125
-
126
-
127
-
128
-
129
-
130
-
131
-
132
-
133
-
134
-
135
-
136
-
137
-
138
-
139
-
140
-
141
-
142
-
143
-
144
-
145
-
146
-
147
-
148
-
149
-
150
-
151
-
152
-
153
-
154
-
155
-
156
-
157
-
158
-
159
-
160
-
161
-
162
-
163
-
164
-
165
-
166
-
167
-
168
-
169
-
170
-
171
-
172
-
173
-
174
-
175
-
176
-
177
-
178
-
179
-
180
-
181
-
182
-
183
-
184
-
185
-
186
-
187
-
188
-
189
-
190
-
191
-
192
-
193
-
194
-
195
-
196
-
197
-
198
-
199
-
200
-
201
-
202
-
203
-
204
-
205
-
206
-
207
-
208
-
209
-
210
-
211
-
212
-
213
-
214
-
215
-
216
-
217
-
218
-
219
-
220
-
221
-
222
-
223
-
224
-
225
-
226
-
227
-
228
-
229
-
230
-
231
-
232
-
233
-
234
-
235
-
236
-
237
-
238
-
239
-
240
-
241
-
242
-
243
-
244
-
245
-
246
-
247
-
248
-
249
-
250
-
251
-
252
-
253
-
254
-
255
-
256
-
257
-
258
-
259
-
260
-
261
-
262
-
263
-
264
-
265
-
266
-
267
-
268
-
269
-
270
-
271
-
272
-
273
-
274
-
275
-
276
-
277
-
278
-
279
-
280
-
281
-
282
-
283
-
284
-
285
-
286
 |
 |