HP DL785 Read Before Install - HP ProLiant DL-Series Carrier-Grade Servers - Page 5
Installing the Breaker in the Breaker Panel
 |
UPC - 883585262809
View all HP DL785 manuals
Add to My Manuals
Save this manual to your list of manuals |
Page 5 highlights
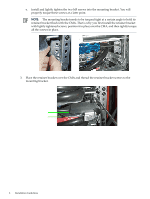
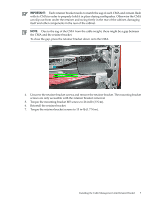
Installing the Breaker in the Breaker Panel CAUTION: For safety purposes, a breaker must be switched to the OFF position when inserted and removed. To install a breaker into the breaker panel, follow these steps: 1. Ensure the breaker is in the OFF position before inserting it into the breaker panel. 2. Install the breaker in the correct orientation, with the breaker handle to the right and the OFF position toward the bottom. 3. Install the two breaker screws. After you install the breaker in the breaker panel, you can connect the DC power supply cables to the back of the breaker panel, and close the breaker panel. Installing the Cable Management Arm Retainer Bracket The function of the retainer bracket is to restrict movement of the cable management arm (CMA) during earthquakes. Install the retainer bracket after you have routed the power and data cables through the CMA. To install the retainer bracket, follow these steps: 1. Pull the CMA away from the chassis. 2. Install the mounting bracket: a. Unscrew the two M5 screws that hold the retainer bracket to its mounting bracket. b. Ensure that you have removed the screws from the mounting bracket. c. Mount the mounting bracket to the bottom two holes of the upper U of the rack. (See picture below.) d. Install the mounting bracket to the inner hole pattern of the cabinet right rail, just above the server rails. The cabinet right rail fits inside the open-hem bend of the mounting bracket. (See picture below.) Installing the Cable Management Arm Retainer Bracket 5
-
 1
1 -
 2
2 -
 3
3 -
 4
4 -
 5
5 -
 6
6 -
 7
7 -
 8
8
 |
 |
