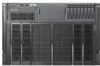
HP DL785 Read Before Install - HP ProLiant DL-Series Carrier-Grade Servers - Page 6
all the screws in place.
 |
UPC - 883585262809
View all HP DL785 manuals
Add to My Manuals
Save this manual to your list of manuals |
Page 6 highlights
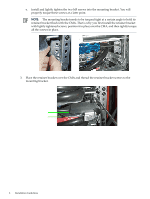
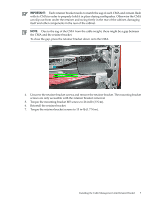
e. Install and lightly tighten the two M5 screws into the mounting bracket. You will properly torque these screws at a later point. NOTE: The mounting bracket needs to be torqued tight at a certain angle to hold its retainer bracket flush with the CMA. That is why you first install the retainer bracket with lightly tightened screws, position it in place over the CMA, and then tightly torque all the screws in place. 3. Place the retainer bracket over the CMA and thread the retainer bracket screws to the mounting bracket. 6 Installation Guidelines
-
 1
1 -
 2
2 -
 3
3 -
 4
4 -
 5
5 -
 6
6 -
 7
7 -
 8
8
 |
 |

e.
Install and lightly tighten the two M5 screws into the mounting bracket. You will
properly torque these screws at a later point.
NOTE:
The mounting bracket needs to be torqued tight at a certain angle to hold its
retainer bracket flush with the CMA. That is why you first install the retainer bracket
with lightly tightened screws, position it in place over the CMA, and then tightly torque
all the screws in place.
3.
Place the retainer bracket over the CMA and thread the retainer bracket screws to the
mounting bracket.
6
Installation Guidelines