HP Dc5850 AHCI and RAID on HP Compaq dc5850 Business PCs - 2nd Edition - Page 11
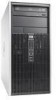
Non-RAID Drive Detection Scheme
 |
UPC - 884962022993
View all HP Dc5850 manuals
Add to My Manuals
Save this manual to your list of manuals |
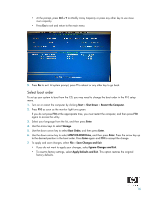
Page 11 highlights
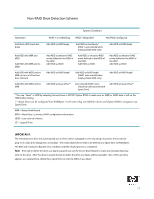
Non-RAID Drive Detection Scheme System Condition Operation RAID 1 or 0 Working RAID 1 Degraded No RAID Con gured Add blank HDD (hard disk drive) Add HDD as RAID Ready Add HDD as Raid Ready* (RAID 1 auto-rebuild when hotplug blank HDD only) Add HDD as RAID Ready Add HDD with MBR and MDD Add HDD with MBR and no MDD Add HDD as whatever RAID mode de ned in the MDD of the HDD Add HDD as JBOD Add HDD as whatever RAID mode de ned in the MDD of the HDD Add HDD as JBOD Add HDD as whatever RAID mode de ned in the MDD of the HDD Add HDD as JBOD Add HDD with MDD and no MBR (once as a LD but has been deleted) Add HDD as RAID Ready* Add HDD as RAID Ready* (RAID1 auto-rebuild when hotplug blank HDD only) Add HDD as RAID Ready* Add HDD with MDD and no MBR Add HDD as Spare Drive** Auto-rebuild (RAID1 autorebuild can directly work with Spare Drive) Add HDD as Spare Drive** *You can "clean" a HDD by selecting Secure Erase in SB700 Option ROM to make sure no MBR or MDD data is left on the HDD before testing. ** Spare Drive can be configured from RAIDXpert. It will write a flag into MDD for driver and Option ROM to recognize it as Spare Drive. MBR = Master Book Record MDD = Meta Data, i.e. previous RAID con guration information JBOD = Just a bunch of drives LD = Logical Drive IMPORTANT: The rebuild process does not automatically occur when a drive is plugged in; this is by design to protect the accidental plug-in of a data drive (diagnostics or backup). The newly added drive needs to be de ned as a Spare drive via RAIDXpert. The BIOS will continue to ag the error condition until the rebuild process is completed. Note: If the tab to de ne the drive as a Spare is grayed out, use the Secure Erase feature to erase any metadata that may exist on the drive. After the drive is erased, the tab to de ne the drive as a Spare will be selectable. Also, if the new drive appears as a Logical Drive, delete this Logical Drive in order to de ne it as a Spare. 11
-
 1
1 -
2
-
3
-
4
-
5
-
 6
6 -
 7
7 -
 8
8 -
 9
9 -
 10
10 -
 11
11 -
 12
12 -
 13
13 -
 14
14 -
 15
15 -
 16
16 -
17
-
18
-
19
-
20
-
21
-
22
 |
 |