HP Designjet L25500 HP Designjet L25500 Printer Series - Maintenance and troub - Page 33
Lack of sharpness, Black areas look hazy, Subtle stains or uneven appearance
 |
View all HP Designjet L25500 manuals
Add to My Manuals
Save this manual to your list of manuals |
Page 33 highlights
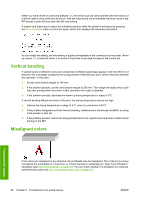
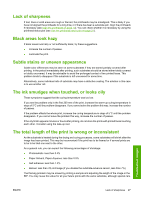
Lack of sharpness If text, lines or solid areas are rough or blurred, the printheads may be misaligned. This is likely if you have not aligned the printheads for a long time, or if there has been a substrate jam. Align the printheads if necessary (see Align the printheads on page 10). You can check whether it is necessary by using the printhead status plot (see Use the printhead status plot on page 21). Black areas look hazy If black areas look hazy or not sufficiently black, try these suggestions. ● Increase the number of passes. ● Laminate the print. Subtle stains or uneven appearance Subtle color differences may be seen on some substrates if they are stored partially covered after printing. In the period immediately after printing, such substrates should be stored either totally covered or totally uncovered. It may be advisable to avoid the prolonged contact of two printed faces. This problem tends to disappear if the substrate is left uncovered for some time. Alternatively, some individual rolls of substrate may have a defective coating. The solution in this case is to use another roll. The ink smudges when touched, or looks oily These symptoms suggest that the curing temperature was too low. If you see the problem only in the first 200 mm of the print, increase the warm-up curing temperature in steps of 5°C until the problem disappears. If you cannot solve the problem this way, increase the number of passes. If the problem affects the whole print, increase the curing temperature in steps of 5°C until the problem disappears. If you cannot solve the problem this way, increase the number of passes. If the oily finish appears minutes or hours after printing, do not store the prints with printed faces touching each other. Consider using the take-up reel. The total length of the print is wrong or inconsistent As the substrate is heated during the drying and curing processes, some substrates will shrink after the image has been printed. This may be inconvenient if the print has to be framed or if several prints are to be to be tiled one next to the other. As a general rule, you can expect the following percentages of shrinkage: ● Photorealistic: less than 0.4% ● Paper-Solvent, Paper-Aqueous: less than 0.5% ● Self-adhesive: less than 1.2% ● Banner: less than 3% shrinkage (if you disable the substrate-advance sensor, less than 7%) The framing problem may be solved by printing a sample and adjusting the length of the image in the RIP. You may reuse this value for all your future prints with the same substrate, although special care Troubleshoot images ENWW Lack of sharpness 27
-
 1
1 -
2
-
3
-
4
-
5
-
6
-
7
-
8
-
9
-
10
-
11
-
12
-
13
-
14
-
15
-
16
-
17
-
18
-
19
-
20
-
21
-
22
-
23
-
24
-
25
-
26
-
27
-
 28
28 -
 29
29 -
 30
30 -
 31
31 -
 32
32 -
 33
33 -
 34
34 -
 35
35 -
 36
36 -
 37
37 -
 38
38 -
39
-
40
-
41
-
42
-
43
-
44
-
45
-
46
-
47
-
48
-
49
-
50
-
51
-
52
-
53
-
54
-
55
-
56
-
57
-
58
-
59
 |
 |