HP Designjet T2300 HP Designjet T2300 eMFP Printer series - Image Quality Trou - Page 34
Defocus, blurring and fading colors
 |
View all HP Designjet T2300 manuals
Add to My Manuals
Save this manual to your list of manuals |
Page 34 highlights
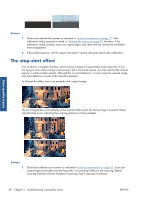
Actions 1. Open the scanner lid. Clean the motor wheels (small black rubber) and the pressure rolls (wide white plastic). Check that all the pressure rolls can move freely. If you find dust particles or objects that obstruct the movement of the rollers, try to remove them, then close the scanner lid and repeat your scan. 2. If the problem persists, clean and calibrate the scanner as indicated in Scanner maintenance on page 37, and analyze pattern 1 of the diagnostic plot. If you can find horizontal periodical banding inside this pattern, as shown on the right below, call HP support and report "horizontal periodical banding". Please note the black arrow indicating the scanning direction in this example. Original Pattern 1 affected by horizontal periodical banding Defocus, blurring and fading colors CIS technology scanners are tuned to work at a fixed focal distance, and they are very sensitive to small variations in the position of the original with respect to the scanner glass plate. If the scanner lid is not properly closed, or if the original has deep wrinkles or texture, you may sometimes find problems as in the following example (on the right), where the scanned image is blurred and colors are faded. Scan-quality issues Actions 1. Check the scanner lid sensor by opening the scanner lid and checking that the five CIS modules show blinking red, green and blue lights alternately. If not, reboot the machine and call HP support reporting the error appearing at the front panel. If no error is given in the front panel then report "scanner lid sensor failure". 2. If all the modules lit up correctly in the previous step, close the scanner lid by pushing it down until you hear a click. Then calibrate the scanner as indicated in Scanner maintenance on page 37 and repeat your scan. 3. If the problem persists, repeat the scan or copy using a higher resolution (High or Max if scanning, Normal or Best if copying). You should also set background cleaning to 0, or set the content type to Mixed. 30 Chapter 3 Troubleshooting scan-quality issues ENWW
-
 1
1 -
2
-
3
-
4
-
5
-
6
-
7
-
8
-
9
-
10
-
11
-
12
-
13
-
14
-
15
-
16
-
17
-
18
-
19
-
20
-
21
-
22
-
23
-
24
-
25
-
26
-
27
-
28
-
 29
29 -
 30
30 -
 31
31 -
 32
32 -
 33
33 -
 34
34 -
 35
35 -
 36
36 -
 37
37 -
 38
38 -
 39
39 -
40
-
41
-
42
-
43
-
44
-
45
-
46
-
47
-
48
-
49
-
50
-
51
 |
 |
