HP Deskjet 970c (English) Windows Connect * User's Guide - C6429-90041 - Page 39
Warning, Do
 |
View all HP Deskjet 970c manuals
Add to My Manuals
Save this manual to your list of manuals |
Page 39 highlights
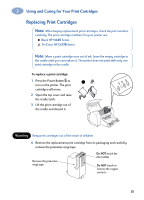
2 Using and Caring for Your Print Cartridges Warning Do NOT touch the print cartridge ink nozzles or copper contacts. Touching these parts will result in clogs, ink failure, and bad electrical connection. Also, do NOT remove the copper strips; these are required electrical contacts. 5 Push the print cartridge firmly, straight down into the print cartridge cradle. 6 Close the cradle latch. When the latch is fully closed, you will hear a click. 7 Load plain white paper in the IN tray. 8 Close the top cover, then a calibration page will print. Note: Any time you install a valid print cartridge, the printer software prints a calibration page to ensure your print quality. If you are in the middle of printing and stop to change a print cartridge, the software will wait until your printing has completed before it executes the calibration test. 9 If the Print Cartridge Status Light continues to blink after you install the new print cartridge, check the part number on the print cartridge to ensure you installed the correct one. 32
-
 1
1 -
2
-
3
-
4
-
5
-
6
-
7
-
8
-
9
-
10
-
11
-
12
-
13
-
14
-
15
-
16
-
17
-
18
-
19
-
20
-
21
-
22
-
23
-
24
-
25
-
26
-
27
-
28
-
29
-
30
-
31
-
32
-
33
-
 34
34 -
 35
35 -
 36
36 -
 37
37 -
 38
38 -
 39
39 -
 40
40 -
 41
41 -
 42
42 -
 43
43 -
 44
44 -
45
-
46
-
47
-
48
-
49
-
50
-
51
-
52
-
53
-
54
-
55
-
56
-
57
-
58
-
59
-
60
-
61
-
62
-
63
-
64
-
65
-
66
-
67
-
68
-
69
-
70
-
71
-
72
-
73
-
74
-
75
-
76
-
77
-
78
-
79
-
80
-
81
-
82
 |
 |