HP E24mv User Guide - Page 10
Front components, Product Notices
 |
View all HP E24mv manuals
Add to My Manuals
Save this manual to your list of manuals |
Page 10 highlights
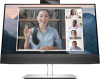
● Support for a mounting bracket to attach the monitor to a workstation NOTE: For safety and regulatory information, see the Product Notices provided in your documentation kit. To access the latest user guide, go to http://www.hp.com/support, and follow the instructions to find your product. Then select Manuals. Front components To identify the components on the front of the monitor, use this illustration and table. Table 1-2 Front components and their descriptions Component Description (1) Tilt levers Allows you to tilt the camera, (2) Camera microphones Allow you to participate in a video conference. (3) Camera light On: The camera is in use. (4) Camera RGB lens Transmits your image in a video conference. (5) Camera IR lens Transmits your image in a video conference. (6) Speaker mute light The mute button has been turned on. (7) Speaker mute button Mutes or restores speaker sound. (8) Speaker button (decrease sound) Decreases speaker volume incrementally while you hold down the key. (9) Speaker button (increase sound) Increases speaker volume incrementally while you hold down the key. (10) Microphone button Turns on the microphone feature. (11) Microphone mute light The mute button has been turned on. (12) Power light White: The monitor is on. Amber: The monitor is in a reduced power state because of inactivity. Blinking amber: The monitor is in a reduced power state because of an Energy Saver setting. 4 Chapter 1 Getting started
-
 1
1 -
2
-
3
-
4
-
 5
5 -
 6
6 -
 7
7 -
 8
8 -
 9
9 -
 10
10 -
 11
11 -
 12
12 -
 13
13 -
 14
14 -
 15
15 -
16
-
17
-
18
-
19
-
20
-
21
-
22
-
23
-
24
-
25
-
26
-
27
-
28
-
29
-
30
-
31
-
32
-
33
-
34
-
35
-
36
-
37
-
38
-
39
-
40
-
41
-
42
-
43
-
44
 |
 |
