HP E24mv User Guide - Page 19
Connecting USB devices (select products only), Adjusting the monitor (select products only)
 |
View all HP E24mv manuals
Add to My Manuals
Save this manual to your list of manuals |
Page 19 highlights
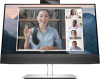
Connecting USB devices (select products only) Use USB ports to connect devices such as a digital camera, USB keyboard, or USB mouse. There are USB ports on the monitor to connect to a device (downstream): two USB Type-A ports on the rear, and two USB Type-A ports on the side. NOTE: You must connect the USB Type-B cable from the source device (computer) to the rear of the monitor to enable the USB Type-A ports to serve as a USB hub for a mouse, keyboards, phones, external hard drives, and practically anything that is USB-connected and can accept 5 V. Table 1-4 USB port locations USB Ports (1) USB Type-B ports (2) USB Type-A ports (2) (3) USB Type-A ports (2) Adjusting the monitor (select products only) To support an ergonomic work space, your monitor offers the adjustment options outlined in this section. WARNING! To reduce the risk of serious injury, read the Safety & Comfort Guide. It describes proper workstation setup and proper posture, health, and work habits for computer users. The Safety & Comfort Guide also provides important electrical and mechanical safety information. The Safety & Comfort Guide is available on the web at http://www.hp.com/ergo. 1. Tilt the monitor head forward or backward to set it to a comfortable eye level. NOTE: This monitor has a camera that can be tilted to the following specifications: -5 to 20°. Connecting USB devices (select products only) 13
-
 1
1 -
2
-
3
-
4
-
5
-
6
-
7
-
8
-
9
-
10
-
11
-
12
-
13
-
 14
14 -
 15
15 -
 16
16 -
 17
17 -
 18
18 -
 19
19 -
 20
20 -
 21
21 -
 22
22 -
 23
23 -
 24
24 -
25
-
26
-
27
-
28
-
29
-
30
-
31
-
32
-
33
-
34
-
35
-
36
-
37
-
38
-
39
-
40
-
41
-
42
-
43
-
44
 |
 |
