HP EVA4000 HP StorageWorks 4000/6000/8000 Enterprise Virtual Array User Guide - Page 101
Replacing the disk enclosure power supply/blower - eva 4000 firmware
 |
View all HP EVA4000 manuals
Add to My Manuals
Save this manual to your list of manuals |
Page 101 highlights
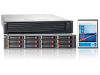
NOTE: It may take up to 10 minutes for the component to display good status. • Check the disk drive status indicators. See Figure 47. • Activity indicator (1) should be on or flashing • Online indicator (2) should be on or flashing • Fault indicator (3) should be off • Check the following using Command View EVA. • Navigate back to the component and check the operational state. It should be . • Ensure the disk drive is using the correct firmware. Check the Firmware Version against the supported disk firmware in the HP StorageWorks Enterprise Virtual Array release notes. The most current edition of the release notes can be downloaded from the following web site: http://www.hp.com/go/eva8000 Click Technical documentation. If the disk drive is using an unsupported version of firmware, download the correct firmware from the following web site and install it using the instructions included with the firmware file. Do not add the disk drive to a disk group if it using an unsupported firmware version. http://h20000.www2.hp.com/bizsupport/TechSupport/Pr oductList.jsp?lang=en&cc=us&prodTypeId=12169&prodSeriesId=352254&taskId=135 Adding a disk to the group After replacing the disk, it should be added to a disk group. The disk is typically added back into its original disk group. 1. In the Navigation pane, select Storage system > Hardware > Rack > Disk enclosure > Bay 2. In the Content pane, select the Disk Drive tab. 3. Click Group to initiate the process for adding the disk to a disk group. NOTE: If the Device Addition Policy is set to automatic, the disk will automatically be added to a disk group. In this case the Group option will not be available. Returning the failed component Please follow the return instructions provided with the new component. Replacing the disk enclosure power supply/blower This section describes the procedure for replacing the power supply/blower assembly used in EVA 4000/6000/8000 products. NOTE: Because this component is used in several products, the drawings may reflect a different enclosure than the one you have. The removal and replacement procedure is the same for each product. Before you begin Observe the following precautions when replacing the power supply/blower. 4000/6000/8000 Enterprise Virtual Array user guide 101
-
 1
1 -
2
-
3
-
4
-
5
-
6
-
7
-
8
-
9
-
10
-
11
-
12
-
13
-
14
-
15
-
16
-
17
-
18
-
19
-
20
-
21
-
22
-
23
-
24
-
25
-
26
-
27
-
28
-
29
-
30
-
31
-
32
-
33
-
34
-
35
-
36
-
37
-
38
-
39
-
40
-
41
-
42
-
43
-
44
-
45
-
46
-
47
-
48
-
49
-
50
-
51
-
52
-
53
-
54
-
55
-
56
-
57
-
58
-
59
-
60
-
61
-
62
-
63
-
64
-
65
-
66
-
67
-
68
-
69
-
70
-
71
-
72
-
73
-
74
-
75
-
76
-
77
-
78
-
79
-
80
-
81
-
82
-
83
-
84
-
85
-
86
-
87
-
88
-
89
-
90
-
91
-
92
-
93
-
94
-
95
-
 96
96 -
 97
97 -
 98
98 -
 99
99 -
 100
100 -
 101
101 -
 102
102 -
 103
103 -
 104
104 -
 105
105 -
 106
106 -
107
-
108
-
109
-
110
-
111
-
112
-
113
-
114
-
115
-
116
-
117
-
118
-
119
-
120
-
121
-
122
-
123
-
124
-
125
-
126
-
127
-
128
-
129
-
130
-
131
-
132
-
133
-
134
-
135
-
136
-
137
-
138
-
139
-
140
-
141
-
142
-
143
-
144
-
145
-
146
-
147
-
148
-
149
-
150
-
151
-
152
-
153
-
154
-
155
-
156
-
157
-
158
-
159
-
160
-
161
-
162
-
163
-
164
-
165
-
166
-
167
-
168
-
169
 |
 |
