HP EVA4000 HP StorageWorks 4000/6000/8000 Enterprise Virtual Array User Guide - Page 96
Replacing the controller power supply - eva 4000 installation guide
 |
View all HP EVA4000 manuals
Add to My Manuals
Save this manual to your list of manuals |
Page 96 highlights
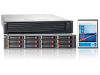
Replacing the controller power supply This section describes the procedure for replacing the power supply used in EVA 4000/6000/8000 products. NOTE: Because this component is used in several products, the drawings may reflect a different enclosure than the one you have. The removal and replacement procedure is the same for each product. Before you begin Observe the following precautions when replacing a power supply. CAUTION: Removing a power supply significantly changes the air flow within the enclosure. Both power supplies must be installed for the enclosure to cool properly. If a power supply fails, leave it in place in the enclosure until a new power supply is available to install. If cabling is obstructing access to the power supply, carefully move the cables out of the way to avoid loosening any connections. Parts can be damaged by electrostatic discharge. Use proper anti-static protection. Refer to the documentation that shipped with your system for additional information. Have a copy of the product User Guide available for reference. You can download a copy of the User Guide from the product support page on the HP web site. Verifying component failure Before replacing a power supply, use the following methods to verify the component failure. CAUTION: If Command View EVA does not present a status consistent with that of the power supply status indicator, or if Command View or the System Event Analyzer indicates multiple hardware failures, contact HP support for assistance. The HP support web site is located at http://www.hp.com/support • Analyze any failure messages you may have received from system monitoring (System Event Analyzer). • Check status using Command View EVA: CAUTION: If you are running HP StorageWorks Command View EVA 4.0, the power supply numbering presented in the management interface is inconsistent with the numbering used in the storage system and reported by the ISEE/WEBES monitoring tool. HP Command View EVA 4.0 identifies the left power supply as 1 and the right power supply as 2. The correct numbering should be 0 and 1 respectively. Remember to make this conversion when replacing a power supply. This inconsistency is corrected in later versions of HP Command View EVA. 1. In the Navigation pane, select Storage system > Hardware > Rack > Controller enclosure > Controller 2. In the Content pane, select the Enclosure tab. The status is displayed in the Power System field. The status should be Failed . 96 Customer replaceable units
-
 1
1 -
2
-
3
-
4
-
5
-
6
-
7
-
8
-
9
-
10
-
11
-
12
-
13
-
14
-
15
-
16
-
17
-
18
-
19
-
20
-
21
-
22
-
23
-
24
-
25
-
26
-
27
-
28
-
29
-
30
-
31
-
32
-
33
-
34
-
35
-
36
-
37
-
38
-
39
-
40
-
41
-
42
-
43
-
44
-
45
-
46
-
47
-
48
-
49
-
50
-
51
-
52
-
53
-
54
-
55
-
56
-
57
-
58
-
59
-
60
-
61
-
62
-
63
-
64
-
65
-
66
-
67
-
68
-
69
-
70
-
71
-
72
-
73
-
74
-
75
-
76
-
77
-
78
-
79
-
80
-
81
-
82
-
83
-
84
-
85
-
86
-
87
-
88
-
89
-
90
-
 91
91 -
 92
92 -
 93
93 -
 94
94 -
 95
95 -
 96
96 -
 97
97 -
 98
98 -
 99
99 -
 100
100 -
 101
101 -
102
-
103
-
104
-
105
-
106
-
107
-
108
-
109
-
110
-
111
-
112
-
113
-
114
-
115
-
116
-
117
-
118
-
119
-
120
-
121
-
122
-
123
-
124
-
125
-
126
-
127
-
128
-
129
-
130
-
131
-
132
-
133
-
134
-
135
-
136
-
137
-
138
-
139
-
140
-
141
-
142
-
143
-
144
-
145
-
146
-
147
-
148
-
149
-
150
-
151
-
152
-
153
-
154
-
155
-
156
-
157
-
158
-
159
-
160
-
161
-
162
-
163
-
164
-
165
-
166
-
167
-
168
-
169
 |
 |
