HP EVA4000 HP StorageWorks 4000/6000/8000 Enterprise Virtual Array User Guide - Page 93
Replacing a controller blower - eva 4000 battery replacement
 |
View all HP EVA4000 manuals
Add to My Manuals
Save this manual to your list of manuals |
Page 93 highlights
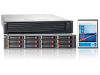
Figure 40 Installing a battery Verifying proper operation After replacing the battery, check the following to verify that the component is operating properly: NOTE: It may take up to 10 minutes for the component to display good status. • Check the battery status indicators. See Table 28 • During the first minute, both status indicators may be on or flashing. • The status indicator (1) should then begin flashing, indicating the battery is charging. It may take several hours for a new battery to fully charge. The fault indicator (2) should be off during charging. After checking the status indicator, install the front panel on the enclosure by pressing it firmly into place. • From Command View EVA • Navigate back to the component and check the status. It should be . • Turn off the locate function by clicking Locate > Locate Off Replacing a controller blower This section describes the procedure for replacing the blower used in Enterprise Virtual Array (EVA) products. Before you begin Observe the following precautions when replacing a blower. CAUTION: Removing a blower significantly changes the air flow within the enclosure. Both blowers must be installed for the enclosure to cool properly. If a blowers fails, leave it in place in the enclosure until a new blower is available to install. Parts can be damaged by electrostatic discharge. Use proper anti-static protection. Refer to the documentation that shipped with your system for additional information. Have a copy of the product User Guide available for reference. You can download a copy of the User Guide from the product support page on the HP web site. Verifying component failure Before replacing a blower, use the following methods to verify the component failure: 4000/6000/8000 Enterprise Virtual Array user guide 93
-
 1
1 -
2
-
3
-
4
-
5
-
6
-
7
-
8
-
9
-
10
-
11
-
12
-
13
-
14
-
15
-
16
-
17
-
18
-
19
-
20
-
21
-
22
-
23
-
24
-
25
-
26
-
27
-
28
-
29
-
30
-
31
-
32
-
33
-
34
-
35
-
36
-
37
-
38
-
39
-
40
-
41
-
42
-
43
-
44
-
45
-
46
-
47
-
48
-
49
-
50
-
51
-
52
-
53
-
54
-
55
-
56
-
57
-
58
-
59
-
60
-
61
-
62
-
63
-
64
-
65
-
66
-
67
-
68
-
69
-
70
-
71
-
72
-
73
-
74
-
75
-
76
-
77
-
78
-
79
-
80
-
81
-
82
-
83
-
84
-
85
-
86
-
87
-
 88
88 -
 89
89 -
 90
90 -
 91
91 -
 92
92 -
 93
93 -
 94
94 -
 95
95 -
 96
96 -
 97
97 -
 98
98 -
99
-
100
-
101
-
102
-
103
-
104
-
105
-
106
-
107
-
108
-
109
-
110
-
111
-
112
-
113
-
114
-
115
-
116
-
117
-
118
-
119
-
120
-
121
-
122
-
123
-
124
-
125
-
126
-
127
-
128
-
129
-
130
-
131
-
132
-
133
-
134
-
135
-
136
-
137
-
138
-
139
-
140
-
141
-
142
-
143
-
144
-
145
-
146
-
147
-
148
-
149
-
150
-
151
-
152
-
153
-
154
-
155
-
156
-
157
-
158
-
159
-
160
-
161
-
162
-
163
-
164
-
165
-
166
-
167
-
168
-
169
 |
 |
