HP HP12C hp 12c_user's guide_English_E_HDPMBF12E44.pdf - Page 195
Appendix E: Battery, Warranty, and Service Information
 |
UPC - 882780792104
View all HP HP12C manuals
Add to My Manuals
Save this manual to your list of manuals |
Page 195 highlights
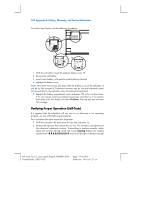
Appendix E: Battery, Warranty, and Service Information 195 the ¼ battery power indicator) should turn on.* If the display shows Error 9, goes blank, or otherwise does not show the proper result, the calculator requires service.† Note: Tests of the calculator's electronics are also performed if the = key or the z key is held down when ; is released.‡ These tests are included in the calculator to be used in verifying that it is operating properly during manufacturing and service. If you had suspected that the calculator was not working properly but the proper display was obtained in step 2, it is likely that you made an error in operating the calculator. We suggest you reread the section in this handbook applicable to your calculation - including, if appropriate, appendix A. If you still experience difficulty, write or telephone Hewlett-Packard at an address or phone number listed under Service (Page 197). * The status indicators turned on at the end of this test include some that normally are not displayed on the hp 12c. † If the calculator displays Error 9 as a result of the ;/µ test or the ;/+ test but you wish to continue using your calculator, you should reset Continuous Memory as described on page 70. ‡ The ;/= combination initiates a test that is similar to that described above, but continues indefinitely. The test can be terminated by pressing any key, which will halt the test within 25 seconds. The ;/z combination initiates a test of the keyboard and the display. When the ; key is released, certain segments in the display will be lit. To run the test, the keys are pressed in order from left to right along each row, from the top row to the bottom row. As each key is pressed, different segments in the display are lit. If the calculator is operating properly and all the keys are pressed in the proper order, the calculator will display 12 after the last key is pressed. (The \ key should be pressed both with the third-row keys and with the fourth-row keys.) If the calculator is not working properly, or if a key is pressed out of order, the calculator will display Error 9. Note that if this error display results from an incorrect key being pressed, this does not indicate that your calculator requires service. This test can be terminated by pressing any key out of order (which will, of course, result in the Error 9 display). Both the Error 9 display and the 12 display can be cleared by pressing any key. File name: hp 12c_user's guide_English_HDPMBF12E44 Printered Date: 2005/7/29 Page: 195 of 209 Dimension: 14.8 cm x 21 cm
-
 1
1 -
2
-
3
-
4
-
5
-
6
-
7
-
8
-
9
-
10
-
11
-
12
-
13
-
14
-
15
-
16
-
17
-
18
-
19
-
20
-
21
-
22
-
23
-
24
-
25
-
26
-
27
-
28
-
29
-
30
-
31
-
32
-
33
-
34
-
35
-
36
-
37
-
38
-
39
-
40
-
41
-
42
-
43
-
44
-
45
-
46
-
47
-
48
-
49
-
50
-
51
-
52
-
53
-
54
-
55
-
56
-
57
-
58
-
59
-
60
-
61
-
62
-
63
-
64
-
65
-
66
-
67
-
68
-
69
-
70
-
71
-
72
-
73
-
74
-
75
-
76
-
77
-
78
-
79
-
80
-
81
-
82
-
83
-
84
-
85
-
86
-
87
-
88
-
89
-
90
-
91
-
92
-
93
-
94
-
95
-
96
-
97
-
98
-
99
-
100
-
101
-
102
-
103
-
104
-
105
-
106
-
107
-
108
-
109
-
110
-
111
-
112
-
113
-
114
-
115
-
116
-
117
-
118
-
119
-
120
-
121
-
122
-
123
-
124
-
125
-
126
-
127
-
128
-
129
-
130
-
131
-
132
-
133
-
134
-
135
-
136
-
137
-
138
-
139
-
140
-
141
-
142
-
143
-
144
-
145
-
146
-
147
-
148
-
149
-
150
-
151
-
152
-
153
-
154
-
155
-
156
-
157
-
158
-
159
-
160
-
161
-
162
-
163
-
164
-
165
-
166
-
167
-
168
-
169
-
170
-
171
-
172
-
173
-
174
-
175
-
176
-
177
-
178
-
179
-
180
-
181
-
182
-
183
-
184
-
185
-
186
-
187
-
188
-
189
-
 190
190 -
 191
191 -
 192
192 -
 193
193 -
 194
194 -
 195
195 -
 196
196 -
 197
197 -
 198
198 -
 199
199 -
 200
200 -
201
-
202
-
203
-
204
-
205
-
206
-
207
-
208
-
209
-
210
-
211
 |
 |