HP Indigo W7200 Writing Head Service Instructions -- CA393-00150Document P/N: - Page 19
Writing head laser power tab, Override, Black Level, Black, Enter, Focus Rear, Focus Front
 |
View all HP Indigo W7200 manuals
Add to My Manuals
Save this manual to your list of manuals |
Page 19 highlights
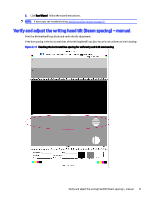
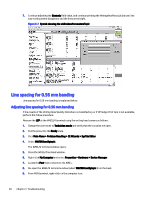
Figure 3-2 Writing head laser power tab 4. Print the WritingHeadFocus.jlt job. Check the 41.2% area (second stripe) in the WritingHeadFocus.jlt printout. See Verify focus fine tuning on page 10. 5. Click the Override check-box to change the Black Level value, and use a densitometer to measure the dot area. You should aim to achieve a dot area of 80% +2%. 6. Leave the window open until the end of the adjustment and banding checking procedure. NOTE: If the window closes the override will be canceled. 7. Adjust the Black Level value. 8. Select Override for Black. 9. Press Enter. Verify focus fine tuning Follow the steps below to verify focus fine tuning. Perform the Verify focus fine tuning on page 10. If HP Indigo Print Care is not available and the banding is very visible perform the following procedure. If the banding is not very visible skip to Laser uniformity on page 12. 1. Turn both the Focus Rear and Focus Front adjustment knobs eight line marks counter-clockwise (one full turn). 2. Print the WritingHeadFocus.jlt job again, and turn both the adjustment knobs clockwise two line marks. Repeat this step until you have printed 9 sets using to the following adjustment knob positions: -8, -6, -4, -2, 0, 2, 4, 6, 8. 3. Find the printout that has the best front focus. Use this value to set the Focus Front adjustment knob. 16 Chapter 3 Troubleshooting
-
 1
1 -
2
-
3
-
4
-
5
-
6
-
7
-
8
-
9
-
10
-
11
-
12
-
13
-
 14
14 -
 15
15 -
 16
16 -
 17
17 -
 18
18 -
 19
19 -
 20
20 -
 21
21 -
 22
22 -
 23
23 -
 24
24 -
25
-
26
-
27
-
28
-
29
-
30
 |
 |
