HP Indigo W7200 Writing Head Service Instructions -- CA393-00150Document P/N: - Page 22
eld value in steps of up to 10 microns for large saw-tooth patterns, or less
 |
View all HP Indigo W7200 manuals
Add to My Manuals
Save this manual to your list of manuals |
Page 22 highlights
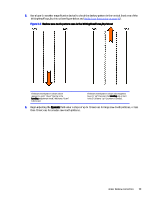
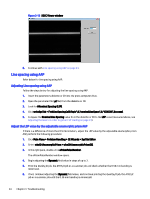
5. Use a lupe (or another magnification device) to check the deskew pattern in the vertical lined area of the WritingHeadFocus.jlt printout (see figure below and Verify focus fine tuning on page 10). Figure 3-6 Deskew saw-tooth pattern seen in the WritingHeadFocus.jlt printout If the saw-tooth pattern shown above appears to point "down" then turn the Leveling adjustment knob 3 full turns "down" (clockwise). If the saw-tooth pattern shown above appears to point "up" then turn the Leveling adjustment knob 3 full turns "up" (counter-clockwise). 6. Begin adjusting the Dynamic field value in steps of up to 10 microns for large saw-tooth patterns, or less than 10 microns for smaller saw-tooth patterns. Linear deskew correction 19
-
 1
1 -
2
-
3
-
4
-
5
-
6
-
7
-
8
-
9
-
10
-
11
-
12
-
13
-
14
-
15
-
16
-
 17
17 -
 18
18 -
 19
19 -
 20
20 -
 21
21 -
 22
22 -
 23
23 -
 24
24 -
 25
25 -
 26
26 -
 27
27 -
28
-
29
-
30
 |
 |

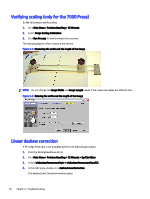
5.
Use a lupe (or another magnification device) to check the deskew pattern in the vertical lined area of the
WritingHeadFocus.jlt
printout (see figure below and
Verify focus
fine
tuning
on page
10
).
Figure 3-6
Deskew saw-tooth pattern seen in the
WritingHeadFocus.jlt
printout
If the saw-tooth pattern shown above
appears to point “down” then turn the
Leveling
adjustment knob 3 full turns “down”
(clockwise).
If the saw-tooth pattern shown above appears
to point “up” then turn the
Leveling
adjustment
knob 3 full turns “up” (counter-clockwise).
6.
Begin adjusting the
Dynamic
field value in steps of up to 10 microns for large saw-tooth patterns, or less
than 10 microns for smaller saw-tooth patterns.
Linear deskew correction
19