HP Integrity BL890c HP Integrity BL860c i2, BL870c i2 & BL890c i2 Server B - Page 111
Replacing the battery mounting bracket
 |
View all HP Integrity BL890c manuals
Add to My Manuals
Save this manual to your list of manuals |
Page 111 highlights
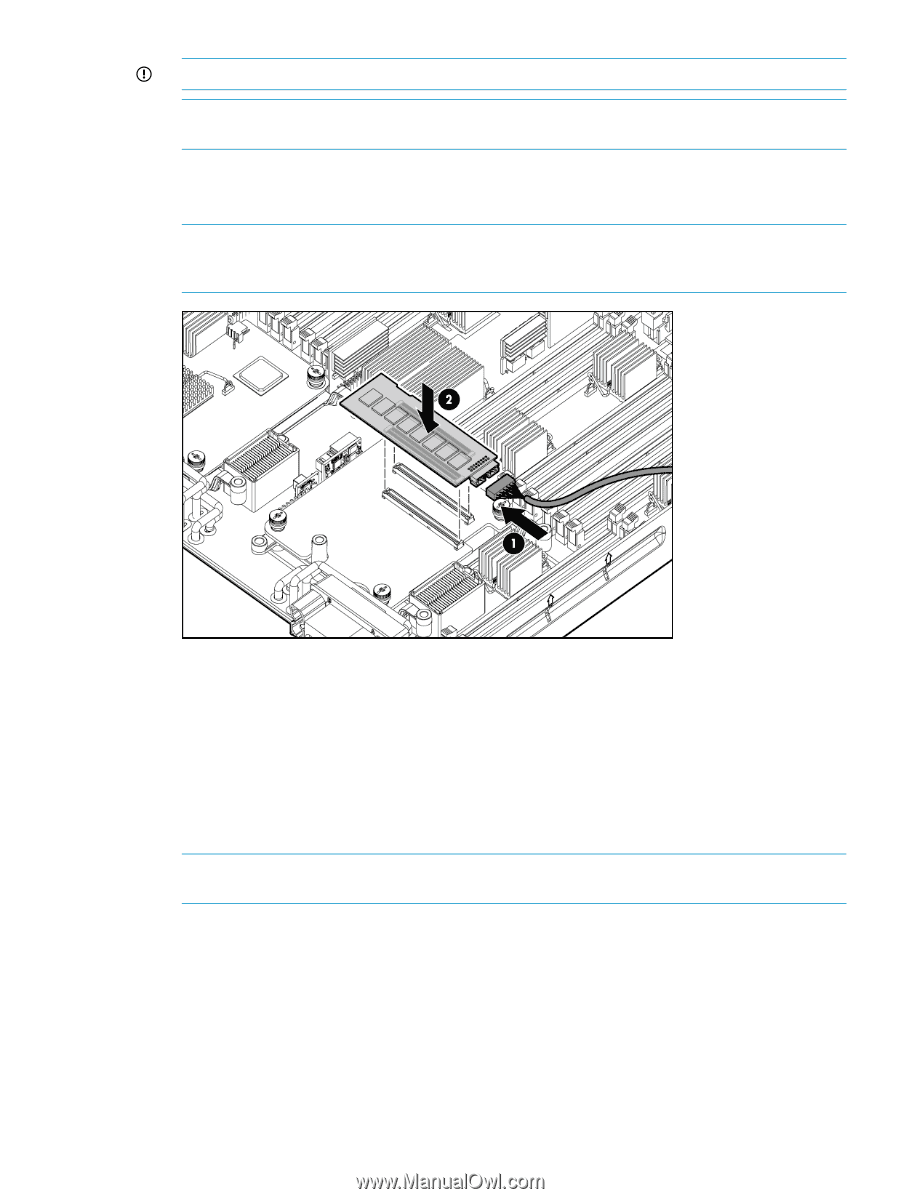
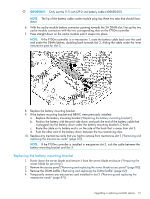
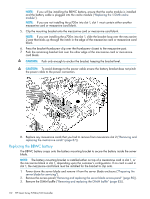
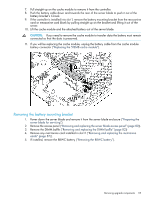
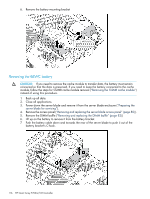
IMPORTANT: Only use the 11.5 inch (29.2 cm) battery cable (408658-001). NOTE: The lip of the battery cable cache module plug has three tiny tabs that should face down. 6. With the cache module battery connector pointing towards the 3A DIMM slot, line up the two cache module connectors with the two corresponding slots on the P700m controller. 7. Press straight down on the cache module until it snaps into place. NOTE: If the P700m controller is in mezzanine 1, route the battery cable back over the card and under the DIMM latches, doubling back towards slot 3, sliding the cable under the inner mezzanine post for slot 3. 8. Replace the battery mounting bracket. 9. If the battery mounting bracket and BBWC were previously installed: a. Replace the battery mounting bracket ("Replacing the battery mounting bracket"). b. Position the battery with the print side down and push the end of the battery cable that is plugged into the battery down under the battery mounting bracket's C-hook. c. Route the cable so its battery end is on the side of the hook that is away from slot 3. d. Push the other end of the battery down between the two restraining clips. 10. Replace any mezzanine cards that you had to remove from mezzanine slot 2 ("Removing and replacing the mezzanine cards" (page 87)). NOTE: If the P700m controller is installed in mezzanine slot 3, tuck the cable between the battery mounting bracket and slot 3. Replacing the battery mounting bracket 1. Power down the server blade and remove it from the server blade enclosure ("Preparing the server blade for servicing"). 2. Remove the access panel ("Removing and replacing the server blade access panel" (page 80)). 3. Remove the DIMM baffle ("Removing and replacing the DIMM baffle" (page 82)) 4. Temporarily remove any mezzanine card installed in slot 2 ("Removing and replacing the mezzanine cards" (page 87)). Upgrading or replacing controller options 111
-
 1
1 -
2
-
3
-
4
-
5
-
6
-
7
-
8
-
9
-
10
-
11
-
12
-
13
-
14
-
15
-
16
-
17
-
18
-
19
-
20
-
21
-
22
-
23
-
24
-
25
-
26
-
27
-
28
-
29
-
30
-
31
-
32
-
33
-
34
-
35
-
36
-
37
-
38
-
39
-
40
-
41
-
42
-
43
-
44
-
45
-
46
-
47
-
48
-
49
-
50
-
51
-
52
-
53
-
54
-
55
-
56
-
57
-
58
-
59
-
60
-
61
-
62
-
63
-
64
-
65
-
66
-
67
-
68
-
69
-
70
-
71
-
72
-
73
-
74
-
75
-
76
-
77
-
78
-
79
-
80
-
81
-
82
-
83
-
84
-
85
-
86
-
87
-
88
-
89
-
90
-
91
-
92
-
93
-
94
-
95
-
96
-
97
-
98
-
99
-
100
-
101
-
102
-
103
-
104
-
105
-
 106
106 -
 107
107 -
 108
108 -
 109
109 -
 110
110 -
 111
111 -
 112
112 -
 113
113 -
 114
114 -
 115
115 -
 116
116 -
117
-
118
-
119
-
120
-
121
-
122
-
123
-
124
-
125
-
126
-
127
-
128
-
129
-
130
-
131
-
132
-
133
-
134
-
135
-
136
-
137
-
138
-
139
-
140
-
141
-
142
 |
 |