HP Integrity rx4640 ATI RADEON 7500 PCI Graphics Controller Installation Guide - Page 23
Changing the Boot Console, ATI RADEON 7500 PCI Graphics Controller Installation Guide,
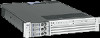 |
View all HP Integrity rx4640 manuals
Add to My Manuals
Save this manual to your list of manuals |
Page 23 highlights
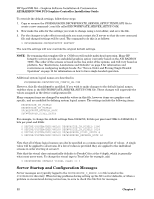
HP-UX Configuration ATI RADEON 7500 PCI Graphics Controller Installation Guide Changing the Boot Console When an ATI RADEON 7500 is installed in the system, the only supported console is the serial console. Use the following instructions to switch the console to the serial device. NOTE: Before switching the console over to the serial console, make sure the serial port is connected to the serial port of another system (or to a dedicated serial terminal) or you will not be able to see any of the console output. 1. Reboot the system 2. While the EFI boot loader is still running , the following menu displays: EFI Boot Manager ver 1.10 [14.61] Firmware ver 2.31 [4411] Please select a boot option HP-UX Primary Boot: 0/1/1/0.0.0 EFI Shell [Built-in] boot lan Boot Option Maintenance Menu System Configuration Menu 3. Using the arrow keys, choose Boot Option Maintenance Menu, and press Enter. The following menu displays: Boot from a File Add a Boot Option Delete Boot Option(s) Change Boot Order Manage NextBoot setting Set Auto Boot TimeOut Select Active Console Output Devices Select Active Console Input Devices Select Active Standard Error Devices Cold Reset Exit 4. Choose Select Active Console Output Devices, and press Enter. This brings up a new menu of possible devices. The current device(s) are marked with a *. The option you will choose is as follows: Acpi(PNP0501,0)/Uart(9600, N81)/VenMsg(PcAnsi) Choose this option press Enter. There is a * next to this option. If there is not a *, press Enter again. Deselect any other entry that has a * next to it (do not deselect the Acpi(PNP0501,0)/Uart(9600, N81)/VenMsg(PcAnsi) entry. When there is only one entry marked with a *, save the device to NVRAM by choosing Save Settings to NVRAM and pressing Enter. Choose Exit and press Enter to go back to the previous menu. 5. Repeat step 5, but choose Select Active Standard Error Devices. 6. After leaving the standard error devices menu, you will be back in the menu from step 4. Choose Cold Reset. This resets the system and sends the console output to the serial console. 16 Chapter 4
-
 1
1 -
2
-
3
-
4
-
5
-
6
-
7
-
8
-
9
-
10
-
11
-
12
-
13
-
14
-
15
-
16
-
17
-
 18
18 -
 19
19 -
 20
20 -
 21
21 -
 22
22 -
 23
23 -
 24
24 -
 25
25 -
 26
26 -
 27
27 -
 28
28 -
29
 |
 |
