HP J Class 3 HP Visualization Center sv6 - Installation and User's Guide and W - Page 52
step 2: copy and register locally, Start the SD copy GUI
 |
View all HP J Class 3 manuals
Add to My Manuals
Save this manual to your list of manuals |
Page 52 highlights
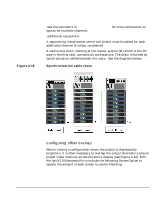
installation and user information updating software Use the default target list which is generated during the initial installation of sv6 systems, /var/opt/sps/sv6files/sv6_targets, or create a new file containing the gigabit hostnames of all systems in your sv6 configuration. The first name in the list must be the gigabit hostname of the master system. For single-channel configurations, the default master hostname is svm, and for multi-channel the default is svm_c1. For this example, our sv6_targets file contains: svm sv1 sv2 sv3 sv4 Touch the .sdkey file on each system to allow for the SD "install to multiple targets" functionality. Use the /var/opt/ignite/sps/sv6files/all script to automatically run this command on all systems in the targets list. all touch /var/adm/sw/.sdkey Enable SD root permissions from the master system to all systems in the target list. master=$(head -1 /var/opt/ignite/sps/sv6files/sv6_targets) all /usr/sbin/swacl -l root -M user:root@$master:crwit step 2: copy and register locally This step meets the requirement of the SD "install to multiple targets" functionality. The patch or depot being applied must be registered on the local (not network mounted) hard drive of the master system. Tape depot format is not supported. The swcopy command converts tape depots into an acceptable format. Key to steps below Menu Selections Buttons Text or commands to be entered (xxx) [xxx] Plain, bold 7. Start the SD copy GUI: swcopy 8. In the target selection window: Example (Actions) [OK] svm 52 Chapter 2
-
 1
1 -
2
-
3
-
4
-
5
-
6
-
7
-
8
-
9
-
10
-
11
-
12
-
13
-
14
-
15
-
16
-
17
-
18
-
19
-
20
-
21
-
22
-
23
-
24
-
25
-
26
-
27
-
28
-
29
-
30
-
31
-
32
-
33
-
34
-
35
-
36
-
37
-
38
-
39
-
40
-
41
-
42
-
43
-
44
-
45
-
46
-
 47
47 -
 48
48 -
 49
49 -
 50
50 -
 51
51 -
 52
52 -
 53
53 -
 54
54 -
 55
55 -
 56
56 -
 57
57 -
58
-
59
-
60
-
61
-
62
-
63
-
64
-
65
-
66
-
67
-
68
-
69
-
70
-
71
-
72
-
73
-
74
-
75
-
76
-
77
-
78
-
79
-
80
-
81
-
82
-
83
-
84
-
85
-
86
-
87
-
88
-
89
-
90
-
91
-
92
-
93
-
94
-
95
-
96
-
97
-
98
-
99
-
100
-
101
-
102
-
103
-
104
-
105
-
106
-
107
-
108
-
109
-
110
-
111
-
112
-
113
-
114
-
115
-
116
-
117
-
118
-
119
-
120
 |
 |
