HP KVM CAT5 0x1x8 KVM Server Console Switch Maintenance and Service Guide - Page 40
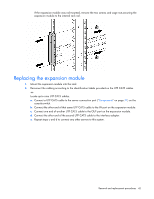
Removing the expansion module
 |
View all HP KVM CAT5 0x1x8 manuals
Add to My Manuals
Save this manual to your list of manuals |
Page 40 highlights
4. Secure the console switch to the rails using the appropriate number of M-6 screws. Removing the expansion module 1. Disconnect all cabling. NOTE: Identification labels are provided on the UTP CAT5 cables to mark the ports to which they are connected. 2. Remove the expansion module from the rack. If the expansion module was Velcro-mounted, pull the expansion module away from the rack. -or- Removal and replacement procedures 40
-
 1
1 -
2
-
3
-
4
-
5
-
6
-
7
-
8
-
9
-
10
-
11
-
12
-
13
-
14
-
15
-
16
-
17
-
18
-
19
-
20
-
21
-
22
-
23
-
24
-
25
-
26
-
27
-
28
-
29
-
30
-
31
-
32
-
33
-
34
-
 35
35 -
 36
36 -
 37
37 -
 38
38 -
 39
39 -
 40
40 -
 41
41 -
 42
42 -
 43
43 -
 44
44 -
 45
45 -
46
-
47
-
48
-
49
-
50
-
51
-
52
-
53
-
54
-
55
-
56
-
57
-
58
-
59
-
60
-
61
-
62
-
63
-
64
-
65
-
66
-
67
-
68
-
69
-
70
-
71
-
72
-
73
-
74
-
75
-
76
-
77
-
78
 |
 |

Removal and replacement procedures
40
4.
Secure the console switch to the rails using the appropriate number of M-6 screws.
Removing the expansion module
1.
Disconnect all cabling.
NOTE:
Identification labels are provided on the UTP CAT5 cables to mark the ports to which they are
connected.
2.
Remove the expansion module from the rack.
If the expansion module was Velcro-mounted, pull the expansion module away from the rack.
-or-