HP Kayak XW U3-W3 HP Kayak XA-s Series 02xx, Chassis Component Replacement Ins
HP Kayak XW U3-W3 Manual
 |
View all HP Kayak XW U3-W3 manuals
Add to My Manuals
Save this manual to your list of manuals |
HP Kayak XW U3-W3 manual content summary:
- HP Kayak XW U3-W3 | HP Kayak XA-s Series 02xx, Chassis Component Replacement Ins - Page 1
HP Kayak XA-s Series 02xx, XU Series 03xx, XW Series U3 & W3 Main Part Replacement Instructions Instructions de remplacement des clothes touch the service part. To equalize the static electricity, rest the service part bag on top of the computer while you are removing the service part from the bag - HP Kayak XW U3-W3 | HP Kayak XA-s Series 02xx, Chassis Component Replacement Ins - Page 2
simple, si vous pensez ne pas être en mesure de le faire vous-même, contactez votre distributeur local ou un agent HP pour acquérir un service de réparation. AVERTISSEMENT COMME AVEC TOUT EQUIPEMENT ELECTRIQUE, UNE MAUVAISE MANIPULATION PEUT ETRE A L'ORIGINE D'UN ACCIDENT OU ENTRAINER LA MORT. SOYEZ - HP Kayak XW U3-W3 | HP Kayak XA-s Series 02xx, Chassis Component Replacement Ins - Page 3
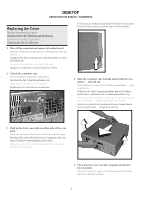
Sostituzione del coperchio Sustitución de la cubierta 1. Turn off the computer and remove all cables from it. Mettez l'ordinateur hors tension et débranchez tous les cover over the computer and lower it into its guides. Placez le nouveau capot sur l'ordinateur et insérez-le dans les rails de montage. - HP Kayak XW U3-W3 | HP Kayak XA-s Series 02xx, Chassis Component Replacement Ins - Page 4
de la tarjeta de ampliación y de la unidad de altavoz 1. Remove the computer cover as described in "Replacing the Cover" on page 3. ihrer Halterung löst. Far scivolare la scatola in avanti finché non esce completamente dalle guide. Deslice el panel LCD a la izquierda para que salga de sus guías de - HP Kayak XW U3-W3 | HP Kayak XA-s Series 02xx, Chassis Component Replacement Ins - Page 5
the LCD Front Panel Remplacement du panneau LCD avant Austauschen der LCD-Anzeige Sostituzione del pannello LCD Sustitución del panel frontal LCD 1. Remove the computer cover as described in "Replacing the Cover" on page 3. Retirez le capot de l'ordinateur tel que décrit à la section "Remplacement - HP Kayak XW U3-W3 | HP Kayak XA-s Series 02xx, Chassis Component Replacement Ins - Page 6
rigido Ventilador del disco duro The hard disk fan is not actually necessary, and only appeared on early desktop models. There is no need to service this part. Le ventilateur du disque dur n'est pas géré par le BIOS sur les machines Desktop. Seul certain modèles DT de la première - HP Kayak XW U3-W3 | HP Kayak XA-s Series 02xx, Chassis Component Replacement Ins - Page 7
coperchio Sustitución de la cubierta 1. Turn off the computer and remove all cables from it. Mettez l'ordinateur hors tension et débranchez -ROM ƒ. ƒ ‚ ‚ 4. Slide the case forward until it is free of its guide rails. Faites glisser le capot vers l'avant pour le sortir des rails. Schieben Sie die - HP Kayak XW U3-W3 | HP Kayak XA-s Series 02xx, Chassis Component Replacement Ins - Page 8
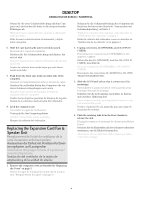
Sostituzione del gruppo Scheda di espansione/ ventola/altoparlante Sustitución del ventilador de la tarjeta de ampliación y de la unidad de altavoz 1. Remove the computer cover as described in "Replacing the Cover" on page 7. Retirez le capot de l'ordinateur tel que décrit dans la section - HP Kayak XW U3-W3 | HP Kayak XA-s Series 02xx, Chassis Component Replacement Ins - Page 9
(con cuidado para no pillar ningún cable) y deslícela de nuevo a su posición (asegurándose de que encajen as pestañas de retención). ‚ ƒ 1. Remove the computer cover as described in "Replacing the Cover" on page 7. Retirez le capot de l'ordinateur tel que décrit à la section "Remplacement du capot - HP Kayak XW U3-W3 | HP Kayak XA-s Series 02xx, Chassis Component Replacement Ins - Page 10
del coperchio" a pagina 7. Retire la cubierta del ordenador como se describe en "Sustitución de la cubierta" en la página 7. 2. Remove the Upper Airflow Guide. Retirez le conduit de ventilation supérieur. Bauen Sie den oberen Lüftungskanal aus. Togliere la guida di aerazione superiore. Retire la gu - HP Kayak XW U3-W3 | HP Kayak XA-s Series 02xx, Chassis Component Replacement Ins - Page 11
Vuelva a instalar los discos duros. 10. Refit the Upper Airflow Guide. Remettez le conduit de ventilation supérieur en place. Bauen Sie den como se describe en "Sustitución de la cubierta" en la página 7. 2. Remove the Expansion Card Fan & Speaker Unit as described in "Replacing the Expansion Card - HP Kayak XW U3-W3 | HP Kayak XA-s Series 02xx, Chassis Component Replacement Ins - Page 12
J20- (MIC IN) Anschluß ab. Staccare i connettori J24 (MULTIMEDIA PANEL MT) e J20 (MIC IN). Desconecte los conectores J24 (PANEL MULTIMEDIA MT) y J20 (ENTRADA MIC). 4. Remove the Multimedia Panel by squeezing its top and bottom and lifting out (taking care not to catch any cables). Tirez et tordez le
-
 1
1 -
 2
2 -
 3
3 -
 4
4 -
 5
5 -
 6
6 -
 7
7 -
8
-
9
-
10
-
11
-
12
 |
 |
1
Main Part Replacement Instructions
Instructions de remplacement des pièces principales
Austauschanweisungen für wichtige Teile
Sostituzione dei principali componenti
Instrucciones de sustitución de piezas principales
HP Kayak
XA-s Series 02xx,
XU Series 03xx,
XW Series U3 & W3
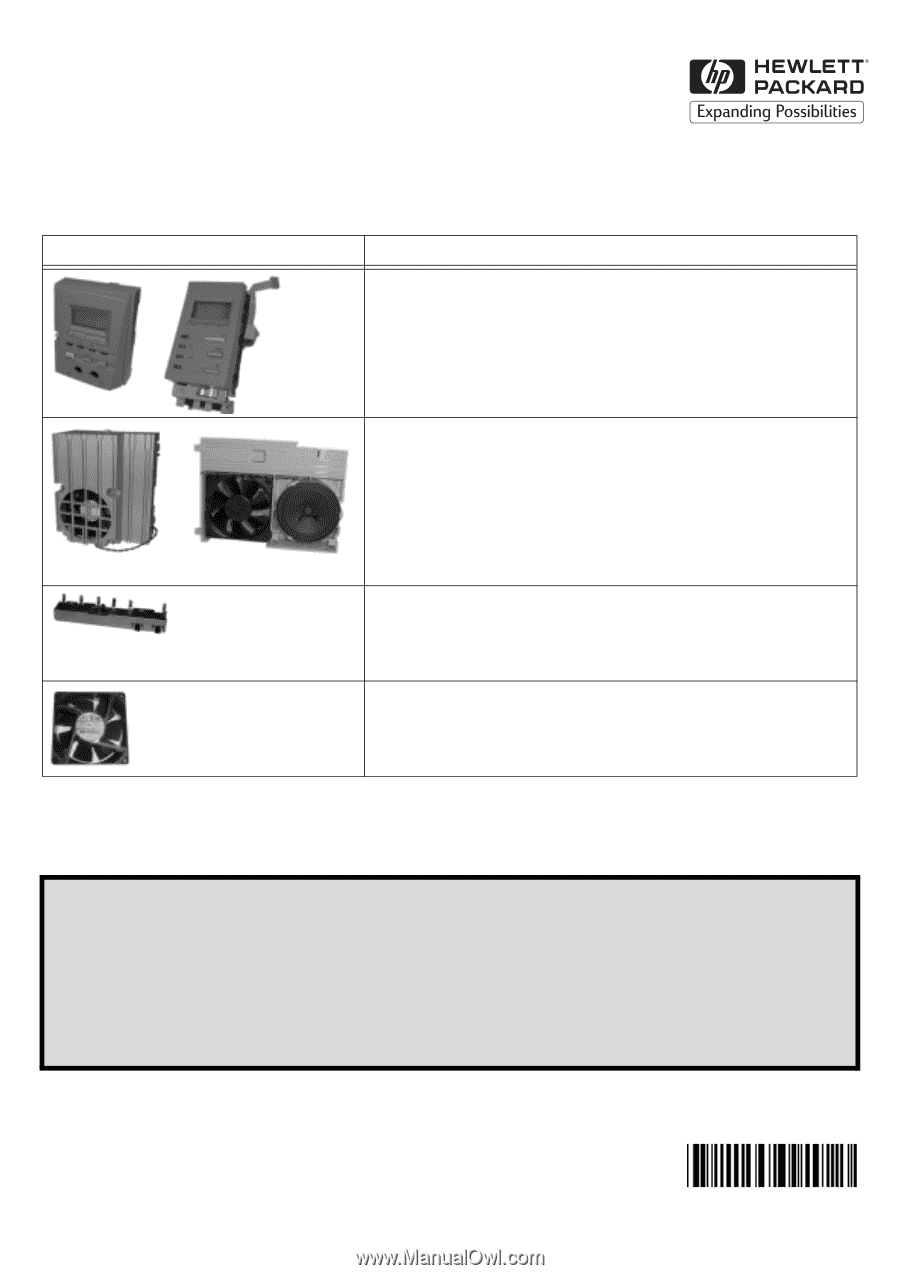
Part
Description
LCD Status Panel (Desktop / Minitower)
Panneau d’état LCD (Ordinateur de bureau / Mini-tour)
LCD-Statusanzeige (Desktop / Minitower)
Pannello di stato LCD (Desktop / Minitower)
Panel de estado LCD (Sobremesa / Minitorre)
Expansion (IO) Card Fan & Speaker Unit (Desktop / Minitower)
Unité du ventilateur de la carte d’extension (ES) et du haut-parleur
(Ordinateur de bureau / Mini-tour)
Einheit mit Ventilator für Erweiterungs- (E/A-) Karten und Lautsprecher
(Desktop / Minitower)
Gruppo scheda di espansione (I/O)/ventola/altoparlante (Desktop /
Minitower)
Ventilador de tarjeta de ampliación (ES) y unidad de altavoz (Sobremesa /
Minitorre)
Multimedia Panel (Minitower only)
Panneau multimédia (Mini-tour uniquement)
Multimedia-Bedienfeld (nur Minitower)
Pannello multimediale (solo Minitower)
Panel multimedia (Sólo minitorre)
Hard Disk Fan (Minitower only)
Ventilateur du disque dur (Mini-tour uniquement)
Festplattenventilator (nur Minitower)
Ventola disco rigido (solo Minitower)
Ventilador del disco duro (Sólo minitorre)
Safety Information
UNPLUG ALL POWER CONNECTIONS TO THE COMPUTER BEFORE ATTEMPTING TO FIT THIS PART.
While replacement of this part is fairly straightforward, if you do not feel comfortable replacing it yourself, please contact your local dealer or HP representative to purchase repair
services.
WARNING
AS WITH ANY ELECTRICAL EQUIPMENT IMPROPER HANDLING CAN CAUSE SEVERE PERSONAL INJURY OR DEATH. CAUTION SHOULD BE USED WHEN WORKING WITH THIS
EQUIPMENT.
Caution — Electrostatic Discharges
Static electricity can damage electronic components. Don’t let your clothes touch the service part. To equalize the static electricity, rest the service part bag on top of the computer while
you are removing the service part from the bag.
Part No.
5967-9536