HP Kayak XW U3-W3 HP Kayak XA-s Series 02xx, Chassis Component Replacement Ins - Page 8
Remplacement de l'unité de la carte d'extension, et du haut-parleur
 |
View all HP Kayak XW U3-W3 manuals
Add to My Manuals
Save this manual to your list of manuals |
Page 8 highlights
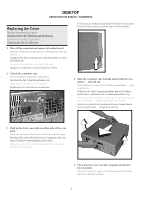
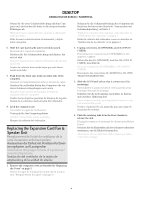
MINITOWER MINI-TOUR / MINITORRE 7. Push down the front case locks on either side of the computer. Abaissez les taquets latéraux placés à l'avant du capot. Drücken Sie auf beiden Seiten des Computers die vorderen Gehäuseverriegelungen nach unten. Spingere in giù i due fermi del pannello frontale su entrambi i lati del computer. Baje las pestañas de bloqueo de la parte frontal de la cubierta a ambos lados del ordenador. 8. Lock the computer case. Verrouillez le capot de l'ordinateur. Verriegeln Sie das Computergehäuse. Chiudere la serratura. Bloquee la cubierta del ordenador. Replacing the Expansion Card Fan & Speaker Unit Remplacement de l'unité de la carte d'extension et du haut-parleur Austauschen der Einheit mit Ventilator für Erweiterungskarten und Lautsprecher Sostituzione del gruppo Scheda di espansione/ ventola/altoparlante Sustitución del ventilador de la tarjeta de ampliación y de la unidad de altavoz 1. Remove the computer cover as described in "Replacing the Cover" on page 7. Retirez le capot de l'ordinateur tel que décrit dans la section "Remplacement du capot" à la page 7. Nehmen Sie die Gehäuseabdeckung des Computers ab. Beachten Sie hierzu den Abschnitt "Austauschen der Gehäuseabdeckung" auf Seite 7. Togliere il coperchio dal computer come descritto in "Sostituzione del coperchio" a pagina 7. Retire la cubierta del ordenador como se describe en "Sustitución de la cubierta" en la página 7. 2. Place the computer on its side. Couchez l'ordinateur sur le côté. Legen Sie den Computer auf dessen Seite. Appoggiare il computer su un fianco. Ponga el ordenador sobre un lado. 3. Unplug connectors J4 (SPEAKER) and J36 (FAN IO CARDS). Débranchez les connecteurs J4 (SPEAKER) et J36 (FAN IO CARDS). Ziehen Sie den J4- (SPEAKER) und den J36- (FAN IO CARDS) Anschluß ab. Staccarre i connettori J4 (SPEAKER) e J36 (FAN IO CARDS). Desconecte los conectores J4 (ALTAVOZ) y J36 (VENTILADOR TARJETAS ES). 4. Press in the retaining tab ‚ and lift out the unit by sliding it upwards. Maintenez le taquet de montage enfoncé ‚ et extrayez l'unité en la tirant vers le haut. Drücken Sie den Haltestift ‚ hinein, und heben Sie die Einheit heraus, indem Sie diese nach oben schieben. Premere in dentro il fermo ‚ e sollevare il gruppo facendolo scorrere verso l'alto. Presione las pestañas de retención ‚ y extraiga la unidad deslizándola hacia arriba. ‚ 5. Replace the expansion card fan & speaker unit. Replacez l'unité du ventilateur de la carte d'extension et du haut-parleur. Tauschen Sie die Einheit mit Ventilator für Erweiterungskarten und Lautsprecher aus. Sostituire il gruppo scheda di espansione/ventola/altoparlante. Vuelva a colocar el ventilador de la tarjeta de ampliación y la unidad de altavoz. 6. Position the unit as shown ‚, rotate it towards the front chassis ƒ (taking care not to snag any cables) and slide it back down into place (ensure the retaining tab clicks). Placez l'unité comme indiqué ‚, faites-la pivoter vers le châssis avant ƒ (veillez à ne coincer aucun câble) et remettez-la en place (le taquet de fixation doit s'enclencher). 8
-
 1
1 -
2
-
 3
3 -
 4
4 -
 5
5 -
 6
6 -
 7
7 -
 8
8 -
 9
9 -
 10
10 -
 11
11 -
 12
12
 |
 |
